

We tend to mix background vocals differently than leads. Depending on the arrangement, they’re usually underneath the lead for support so they don’t steal the show.
In some cases, background vocals will actually overtake the leads, such as in a big chorus for example. But most of the time, they’re right where the name implies – in the background. Here’s how to separate the background from lead vocals in practical, tasteful ways that suit many mixes!
How to Mix Background Vocals Like a Pro
Mixing vocals takes advantage of all the basic mix elements, including level, panning, EQ, compression, and space. We should be actively thinking about contrast to make backgrounds sound different from the leads as well. Every instrument needs its own place to live, and vocals are no exception.
Step 1: Set Levels
This is a logical place to start. Common practice tells us to start mixes by setting relative levels amongst all the instruments. A really well-recorded song can start to come alive even in this very early stage.
Background vocals should sit somewhere underneath the leads in terms of volume. There’s no one-mix-fits-all dB amount to go by, but you should definitely be thinking in terms of quieter backgrounds and louder leads.
By decreasing them a fair amount, you should hear right away that the lead vocals stays on top, but that the backgrounds support them from further back.
Step 2: Adjust Panning
If you have multiple background vocal tracks for the same part, you can get incredible width by panning them left and right. For a pair of backgrounds, you could try going hard left and hard right. With three backing vocals, one can stay center and the others can go left and right. With four, one pair can go hard left/right, and the other pair can go gently left/right. You get the idea!
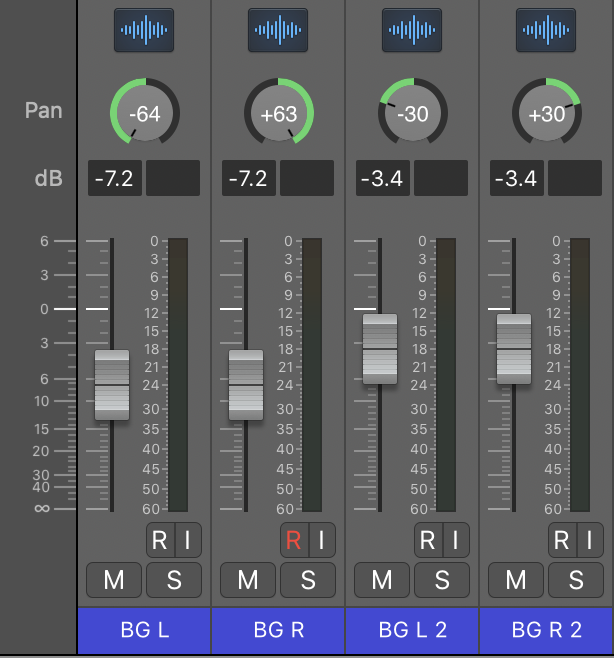

Not only does panning background vocals create stereo width, it also leaves room for the lead vocals to shine out front and (literally) center.
- Related: 5 Quick Panning Mixing Tricks
Step 3: EQ The Vocals Differently
Unless you want all your vocals competing for the same spot in the mix, you should arm yourself with a high- and low-pass filter in each hand.
If you don’t high-pass the low-end on your backgrounds, you could find that all the vocals together have a muddy bass build-up. And remember, we’re ultimately going for contrast — background and lead vocals should sound different from one another. Rolling off a pretty significant amount of low-end ensures that the backgrounds tuck neatly and don’t overwhelm the leads.
The same goes for low-passing the high-end. You don’t need to cut out all the highs completely, but a gentle filter will let the lead vocals do their thing. Of course, you could get full-on telephonic with your filters if that’s what the material calls for!
However, even with just setting an appropriate level, panning them, and moderately filtering them, background vocals find their place in the mix.
BONUS TIP: There’s another trick mixers use which is doing the opposite to one track what you’ve done to another. For example, if you boosted 3 kHz on the lead vocal by 2 dB, you’d try cutting 3 kHz on a background vocal by 2 dB. Again, it’s all about contrast! Keep this trick in your pocket as well and see how it works for your mixes!
Step 4: Add Compression
Typically you’d hit background vocals much harder with the compressor than the leads. This is because you don’t want them suddenly jutting out in front of the mix during a particularly dynamic section.
Higher ratios and greater amounts of gain reduction is where it’s at. Don’t be afraid to really smash them, just to see what it sounds like! Have fun with it under the notion that you’re going for ultimate control over their dynamic range. Whether you want that control to be clean and transparent or full-blown distortion is up to you and the mix!
Step 5: Use Reverb
You can clearly separate the lead vocal from the background vocals by putting them in different spaces altogether. Sometimes it sounds really cool to have a nice lush reverb with long decay on the backgrounds, while the lead stays in-your-face using a shorter reverb.
Context is important and will dictate what kinds and how much reverb you use. Definitely just think about mixing background vocals ‘in a different room‘ than the leads!
Step 6: Treat All Background Vocals as One
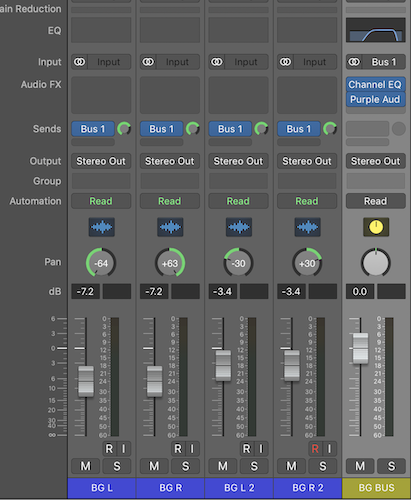

Finally, when you have lots of different background tracks, it’s very helpful to think of them as one instrument. So bussing them together and using the same processing across the board is a quick way to get them mixed together, working as a unit.
It’s also a helpful way to stay organized and not lose track of what could potentially be a dozen or more backgrounds!