
How to Use F. Reid Shippen’s Drum Replacement Plugin of Choice
In our blog post “Get F. Reid Shippen’s Drum Samples,” Reid mentioned a drum trigger software that “may or may not be coming out that he can’t confirm nor deny” (Link to video at 19:35). Well, the cats out of the bag and UVI has graciously sent over a copy of Drum Replacer. To celebrate, we’re going to teach you the ins and outs of this groundbreaking plugin. Also, while you’re at it, get Reid Shippen’s drum samples from the blog post.
When I initially started using UVI, it was for their Workstation, a soundbank player complete with built-in effects. I’ve owned their Darklight IIx, which is a dead ringer version of the old school Fairlight CMI Synth. Additionally, the company made its way into effects, with several reverbs that have caused quite a stir in the plugin community. Now, UVI is taking on a workflow that’s dominated by a few top dogs in the industry with Drum Replacer.
But Why?
I’m sure you’re very comfortable with your plugin that swaps or blends a new sample in with your own. I know I was. I’ve pretty much used the same plugin since I got into drum replacement. The thing about getting too comfortable is that it leads to complacency, and you may miss out on a new tool that will make your life easier. I’m going to make sure you’re not the last horse crossing the finish line with this one.
UVI Drum Replacer is not your run-of-the-mill triggering software. Can your plugin use Virtual Instruments instead of samples if you want? Does it use machine learning to break a sound down to its fundamental core to ensure accurate triggering? Can it automatically pitch your sample to match your source audio? If not, keep reading.
Drum Replacer comes in your standard flavors of VST, AU, and AAX and is supported by pretty much any of the major (and even some less known) DAWs. Install and authorization is a breeze with the UVI Portal, a piece of software that handles your authorization, downloading, and installation of all UVI products. Lastly, UVI gives you the choice of a local authorization of up to three activations or linking your iLok to the software.
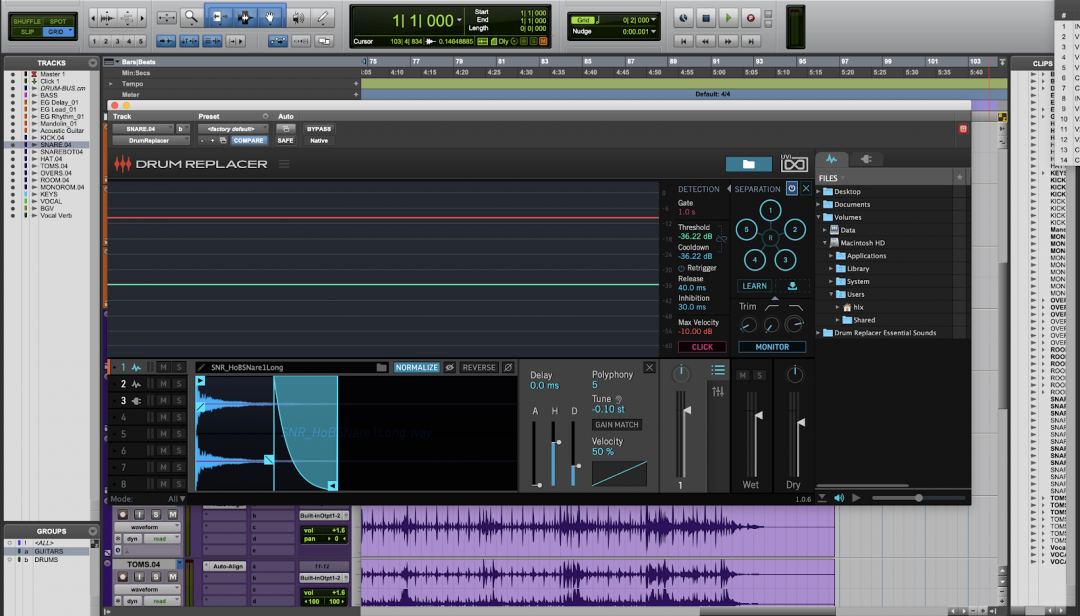
The Interface

Let’s take a look at the GUI. That’s a lot of feedback in one window, and it may look like more controls than what you’re used to, but hang in there, we will have you up and running in no time. It’s not hard at all to use and laid out quite intuitively once you understand the sections. Additionally, Drum Replacer displays tooltips in the bottom bar in the center of the GUI for any control. Just hover your mouse over the parameter in question.
The main sections consist of the following:
- Central Analyzer
- Detection
- Part Section
- Separation
- Browser
- Output
Each section of the interface houses a specific set of tools needed for replacement. Don’t worry; we will go into each in detail.
Central Analyzer
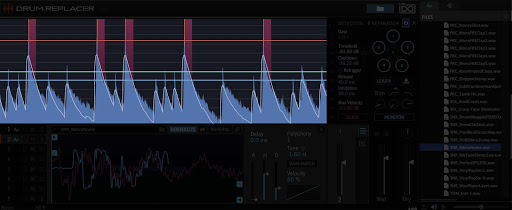

This section gives you visual feedback on the incoming signal as well as the various controls in the Detection section. If a setting has a visual representation, the Analyzer color codes it to that particular control. For instance, the blue waveforms represent the peak level while the white line is the signal’s RMS. To further manipulate detection, a threshold control (the green line) dictates what will trigger Drum Replacer. Any of the white lines above the green line triggers the plugin; everything below does not. The blue line corresponds to the Cooldown control, which we will go over in the next section, and the red line represents the Max Velocity. Lastly, we have the magenta vertical line that displays a visual of the Gate Detection control. Now that we’ve introduced the visuals let’s look at some of the actual functions that are behind each of the Analyzer’s pretty colors.
Detection
What’s all of the pretty colors if you can’t control them, right? The Detection area does just that, complete with color-coded values. Starting from the top, we have the Gate, which adjusts the cutoff of the detection in milliseconds. The Threshold moves the green line in the analyzer to tailor detection. Any RMS signal above the line gets triggered.
To complement the Threshold, the Cooldown prevents another trigger from happening until the signal drops below the blue line. By default, UVI has these two linked, but you can unlink by clicking the icon just to the right of both the controls. Retrigger disables the cooldown when activated and lets multiple signals to trigger while above the threshold. Cooldown can be useful during fast drum rolls that sometimes get lost in the fray. Conversely, this control can get out hand easy, but the Release control can help tweak the triggering.
Rounding out the Detection area, Inhibition also can help by setting the minimum time between trigger events. The last two controls are Max Velocity and the Click button. Max Velocity works with virtual instruments to set the reference RMS level to a maximum MIDI velocity. Finally, Click works as a placeholder if you haven’t found your sample by playing a metronome-esque click when the plugin’s setting would trigger a sample.
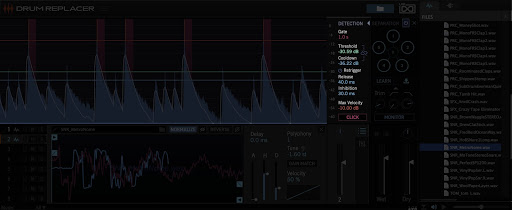
Separation
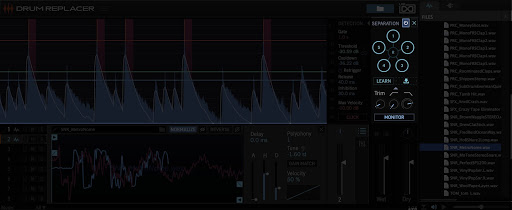
If Detection weren’t enough, UVI is pushing the concept to all-new levels with advanced tools that can go beyond even just sample triggering. Separation uses machine learning to break source audio down to base components, separating the wheat from the chaff. To utilize separation, first, enable Separation with the power button at the top of the section. Then select the Learn icon while your track is playing audio. Alternatively, you can load a sample from your DAW with the Drag and Drop button next to the Learn” icon.
Once detected, Drum Replacer divides the source in up to six different components of audio. These are represented by the five circles surrounding the circled “R.” The audio in circle one has the most energy descending to five (the least). The “R” is where the remainder of the audio is stored. For further adjusting, a Trim control can increase the signal level and High, and Low-Pass filters can dial in the exact section of frequency you want to trigger the sample. Lastly, you can listen to your detection stage with the Monitor button.
You may be asking why this is even necessary. While it may look overkill, it’s a very intelligent gate. In one window, Separation works to remove everything you don’t need for triggering, no more placing a gate on your snare track or slicing audio just to get the transient. Drum Replacer quickly does it for you. Second, you don’t even have to use this to replace a drum sample. Enabling the Monitor button, you can analyze, say a bottom snare mic that has a ton of bleed, and use the Separation components to filter out what you don’t want. Additionally, you can pair this with the Gate in the Detection section to shorten the source audio altogether.
I usually start by de-selecting the “R.” The “Remainder” is where the bulk of the bleed will be in most cases. From there, start at the higher numbers and de-select those if they remove additional artifacts. In most cases, just removing the “R” section will do the trick. In some cases, taking anything else out can sound a little strange. Either way, the result is a short transient for either detection or cleanup.
Browser
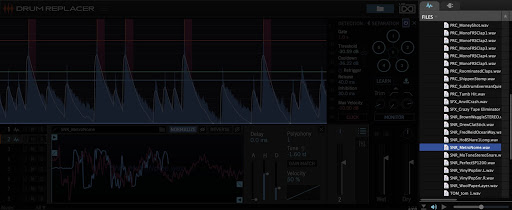
So, we’ve dialed in triggering and used our Click control as a placeholder for long enough. Let’s make some magic. The Browser section is your one-stop-shop for sounds. To open the Browser, click the Folder icon in the top right corner of the interface (just next to the UVI logo). The interface expands on the right, revealing a tabbed navigation section.
The first tab is for actual samples; the second tab is where things get fun. Since you can use VSTis in Drum Replacer, the second tab displays your various instruments. If you don’t see them and know in your heart that they’re installed, simply click the drop-down next to Plugins and hit “Refresh” and Drum Replacer will look again (If you have a lot of VSTi’s, you may want to take a break and stretch your legs).
Finally, if you’re like me and have samples from everywhere and in between, they may not be as organized as you’d like. While UVI can’t help you with that currently, they can make finding your favorites easier. To mark a particular sample a favorite, click the star to the right of the sample name. To just see your favorites, click the star on the right side of the browser.
Part Section
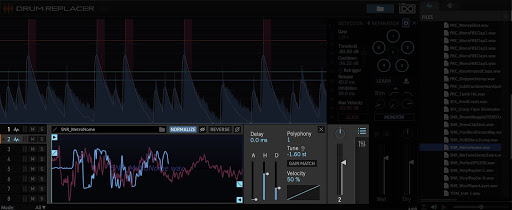
The Part Section is where the rubber meets the road. All of that work dialing in the right detection has all come to this section. Like the upper sections of the interface all work together, the lower does the same, with each section adapting to what it in individual slots.
Starting on the left, eight Part slots are vertically arranged. Each feature a Level Meter, Solo, and Mute. These slots can hold separate samples, variations of the same sample, VSTi’s, or combinations of samples and VSTi’s. To load whichever, just drag the file from the browser into the slot you want. Depending on which type you’ve drug in, the Edit Section and Part Settings panels to the right of the slots will adapt to the content with custom controls for each.
At the bottom of the slots is a Mode button. The Mode dropdown offers multiple ways in which the slots interact with each other. Below is a description of each:
- All: In this setting, all slots trigger at once
- Sequence: Each slot plays sequentially
- Random: Each slot plays in random order
- Velocity: The slots are divided into velocity ranges based on how many slots are populated. As the detector determines the velocity of the source, the slot that matches the velocity will trigger.
The middle area of the Part Section is multi-purpose. On the right side, you will see a tab just to the left of the Wet / Dry meters. The top tab is the Edit Toggle. This houses controls based on whether the slot has a sample of VSTi in it. The bottom tab is the Mixer Toggle. This section opens a mixer channel for each of the eight slots. On top of volume controls, the channels have Panning, High or Low-Pass Filters, Solo, Mute, and Level Meter. Each Part’s name is displayed vertically next to the number for easy reference.
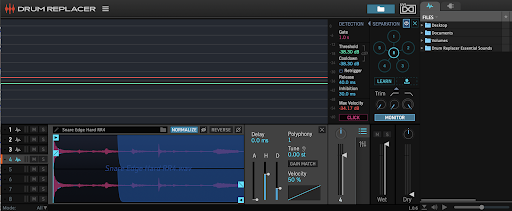
Sample Part Edit Features
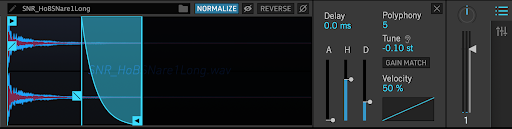

This display has some additional clever tricks up its sleeve that I don’t think I’ve seen on other plugins like it. The cyan vertical bars on either side of the waveform can fade in, out, and adjust the start and end time of the sample. Combine this with the attack, hold, and decay envelope and new possibilities for bringing out the best characteristics of each sample. Use only the attack on one and soften the transient on another and just capture the sustain. If the sample has a little flam on it – easy, the Delay control can shift the sample either positive or negative. The world is literally your oyster.
The insanity continues with even more controls. Polyphony controls how the next trigger will respond to the previous. If it’s set on 1, the next note will chop off the tail of the previous when triggered. This is great for hip-hop samples for hats and snares to give them that choppy sound. This may not sit right with acoustic drums but fear not. Just turn the polyphony up to get a more natural transition.
You’ve always been told to tune your drums to the song right? What happens when you add four more samples that aren’t. Well you can use a plugin to pitch them, but why waste the time? The Tune controls allow you to pitch up to 48 semitones. If you’re even lazier (which I am), just press the Ear icon and Drum Replacer will do it for you! An added Velocity curve can dial in your level to be controlled by trigger velocity as well. Lastly, at the end is the individual channel from the mixer section so you don’t have to switch back and forth.
Plugin Part Edit Features
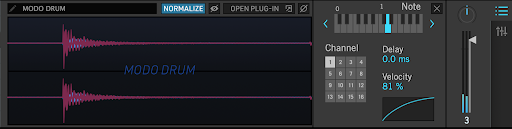
The Display section works similarly with the same Phase and Normalize controls, but with an added Open Plug-in button that shows the VSTi’s GUI. The right side is where things deviate. A keyboard sits at the top which you use to select the sound on the VSTi you want to trigger. The MIDI Channel is selected in the channel matrix and Delay and Velocity are present as well to line the hit with the source at the right amplitude. The percentage of velocity can be tweaked to match the source more closely and the Velocity curve can change to create a more dynamic player.
Output Section
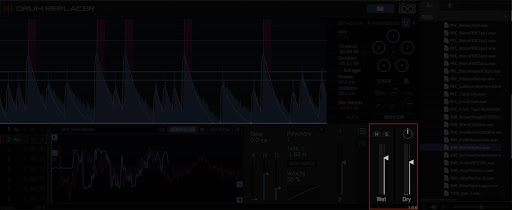
To round out Drum Replacer, the Output section features separate Wet / Dry sliders, Solo, Mute, and Trim knob.
In Use
I’ve personally never found a more versatile drum replacement plugin. It’s taken the best things from both a virtual drummer and real samples and combined them in one intuitive interface. I know the controls can look a little daunting, but once you pick up the workflow, you’re not going to want to put this plugin down. The intelligent gate has found its way on tracks that I’m not even replacing drums on. The plugin’s ability to carve out the best parts of each sample make it stand out from the pack. I use the decay of one sample combined with the attack of another to form the perfect snare. I throw in Superior Drummer with SSD and add a pinch of a sample to make a bigger-than-life kick drum.
As far as value for money, you’re not going to beat it. Coming in at $99.00, UVI easily could have charged much more and still be worth every penny. So there you have it. I’ve taught you how to use it, it’s only $99. You have no excuse for lackluster drum tracks. Go out, get it, and use it with Reid’s drum samples and get to mixing!
To purchase, visit https://www.uvi.net/drum-replacer
To read my interview with F. Reid Shippen, visit What I Learned from F. Reid Shippen
To learn more of F. Reid Shippen’s tricks, buy his course on Pro Mix Academy