
Apple’s Logic Pro X is an industry-standard DAW known for its massive built-in virtual instrument and loop library, as well as its intuitive piano roll and MIDI editing capabilities. Logic’s interface overall is attractive and intuitive, and it’s priced at a point anyone can afford when getting started in music production.
Logic Pro X is a great all-around DAW, excelling at songwriting and production, and it makes recording, editing, and mixing accessible with professional results. Its stock plugins are fantastic and easy to use as well! Just about everything you need is all ready to go and right in there. This is what makes it a great DAW for beginners to
This Logic Pro X tutorial is intended for beginner to intermediate users. Maybe you’ve opened up Logic before and gotten somewhat familiar with its layout, and now you want to get started mixing!
We’ll cover the basics, such as opening a new session; importing audio; setting levels; panning; and using Logic’s powerful stock EQ, compression, and reverb!
- Related: What’s new in Logic 10.5?
Logic Pro X Tutorial: Opening a New Session
When you fire up Logic for the first time, you’ll be greeted by a window asking you what you want to open. You’ll have the option of opening existing sessions or creating a new one. Logic offers several session templates to get you going, or you can open a new empty project. For the first time, Empty Project is a good place to start.
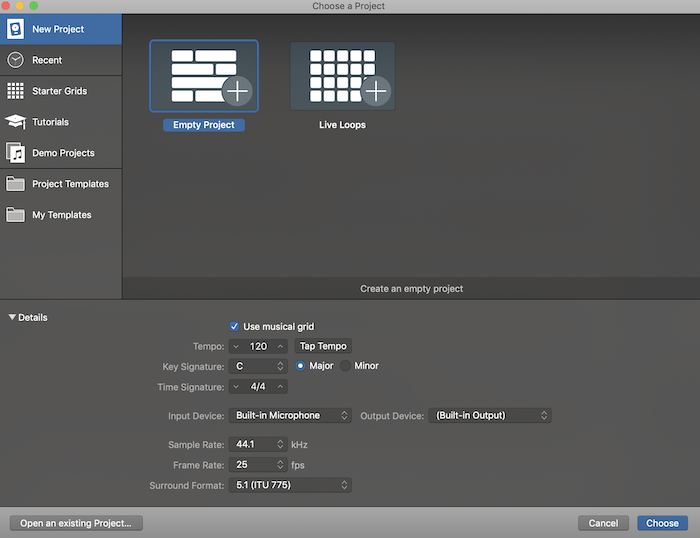

Next, you’ll be asked what kind of track you want to begin recording and/or mixing. Here, choosing an Audio Track is fine. You always have the ability to add more tracks later. We’re primarily more concerned with how to set the sample rate and bit depth once a new session is already open.
Sample Rate
You’ll find the ability to change sample rate from the File > Project Settings > Audio menu. The default sample rate is 44.1 kHz with options all the way up to 192 kHz. The higher the sample rate, the better quality your recordings will be. However, the file size will be significantly greater as well.
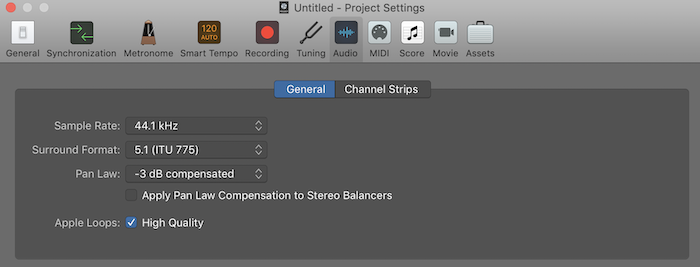

As a general rule of thumb, your sample rate should be twice as high as the highest frequency you intend to record. As the human ear only goes up to 20 kHz in the most extreme cases, the default 44.1 kHz is quite adequate.
The only other consideration for higher sample rates is “foldover,” where instruments in an extremely high frequency range have nowhere to go beyond the sample rate, and are “folded over” into the recording. This could hinder the overall quality of your recordings.
44.1 kHz will serve you well for most applications.
Bit Depth
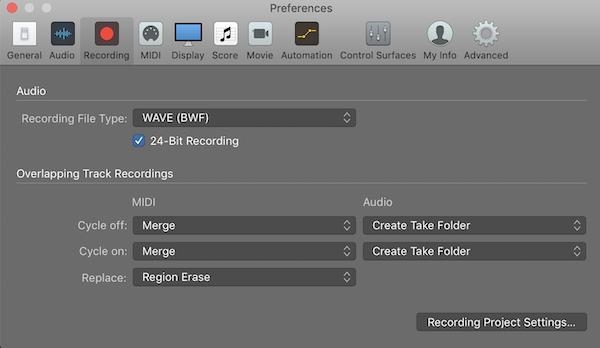

Bit depth determines the overall dynamic range of your recording. There are 6 dB worth of headroom in each bit, so a bit depth of 24 offers 144 dB of dynamic range. You can set bit depth from the Logic Pro X > Preferences > Recording menu.
By default, Logic’s bit depth is 16. You can choose 24 by checking the box in the Recording menu. 24-bit recording creates a much lower noise floor, while file size will be slightly larger.
For most purposes, recording at 24-bit/44.1 kHz is perfectly adequate.
Importing Audio
Using a Finder Window
You’ll need to import audio when you have the opportunity to mix tracks someone else has sent you, or if you export your own tracks for mixing in a different session. There are a few different ways to go about it, and some are more efficient than others.
The first way to import audio into Logic Pro X is to find the files in your Finder window, highlight them, and simply drag them into your session. A green “+” sign appears in the DAW, at which point you can drop the files into the session.
From here, a dialogue box will ask you whether you want to Create new tracks, Use existing tracks, or Place all files on one track. Select Create new tracks, and each file you’ve imported will be added into the session on its own track.
Using the Import Function in Logic Pro X
Another way to import files into Logic is to do so using the Import menu. You’ll find it under File, where you’ll have the option to import Audio, MIDI, MusicXML, and other types of files and data.
If you select Audio File from the Import menu, a dialogue box will open allowing you to find the tracks for import. Even easier is using the key command “shift + command + I” to open up the import audio function.
Starting a Mix: Set Your Levels
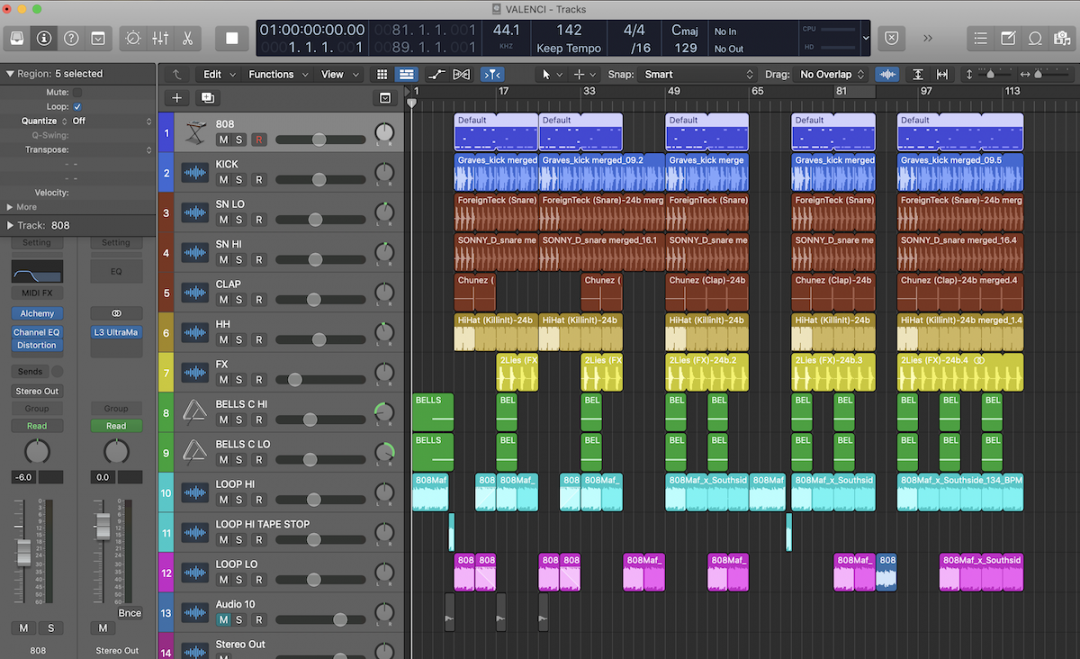
Opening the Mixer Window and Color Coding Tracks
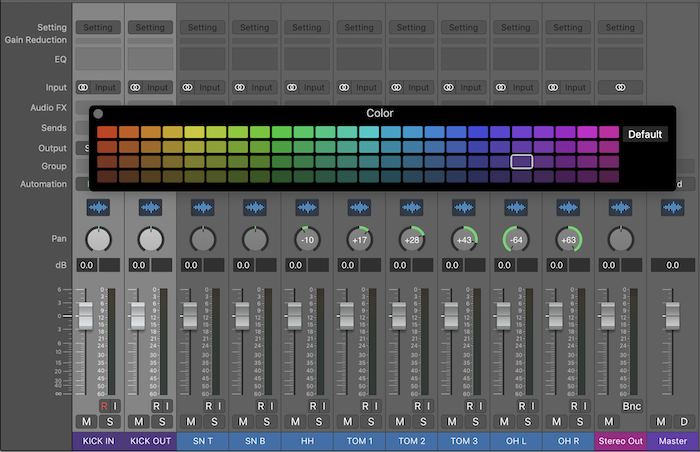

Before you dive in and start moving faders, you’ll need open up the mixer window using the keyboard shortcut “Command + 2.“ This will give you a nice fullscreen view of the mixer rather than a smaller window inside the arrangement view.
It’s also a great idea to color code your tracks to keep things tidy and easily identifiable. This is especially important the more tracks you have to mix!
For example, you can start making all of your drum/percussion tracks the same color. Make a selection by clicking the first track and dragging to the last one. Open up the color picker using “Option + C” and choose whichever makes the most sense to you!
Setting Basic Levels: The Start of a Mix
Once you’ve organized your session to your liking, you can start setting levels! You’ll first want to get an idea of the overall dynamic range of the song, which can be done by looping a section of a verse and chorus. Listening to this will help you determine where things should begin to sit relative to one another.
At this point you can get hands on and move faders! You’ll likely find lots of instruments that are way too loud, so you can tuck those in under the others. You’ll also notice in Logic Pro X that selecting more than one track and moving one’s fader will move all the selected tracks’ faders simultaneously. This is great for, say, a left and right rhythm guitar, or any other stereo pair of instruments.
Mixing basic levels is a matter of taste and how you interpret the song, so it’s best to just jump in and get started! Just make sure you give yourself plenty of headroom and that you aren’t clipping. Lots of engineers recommend bringing all the tracks down to -10 dB when starting a mix just to create headroom.
Starting a Mix: Panning
Panning instruments around the stereo field is usually the next step after setting basic levels. The concept behind panning is simple: we don’t necessarily have to hear the same thing in both the left and right channels at all times. You can even get really creative with your placement of elements in the stereo field to add interest to your mixes!
Logic Pro X offers three different types of panning.
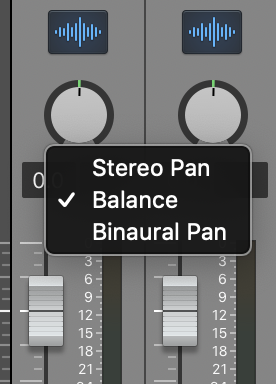

By right-clicking the panner found above the fader in the mixer window, you’ll open up a box allowing you to select between “stereo pan, the default “balance,” and “binaural pan.” The latter is mostly used for post-production, which we won’t delve into just yet.
Balance is used for mono tracks where we have just a single audio signal. Stereo pan takes into account both channels of audio on your stereo tracks, which can be very useful on, say, a stereo recorded keyboard.
From there, it’s again a matter of moving instruments around to taste! Some more obvious panning moves are left and right rhythm guitars, panning overheads or other percussion left and right, etc.
It’s a matter of experimentation, so jump right in and get panning — it’s fairly self-explanatory once you get started!
Logic Pro X Tutorial: Using Stock EQ

Logic comes with a handful of really great stock EQ plugins, but most of the time you’ll probably be reaching for the Channel EQ. It’s excellent for beginners because it has a spectrum analyzer, showing you the frequency content of a track in real-time.
There are two different ways to open up the Channel EQ in Logic. The first is to locate the Audio FX section of a channel and find EQ in the drop-down list of plugins. The second, and easiest way, is to click the EQ Thumbnail window on a track which opens the Channel EQ by default.
Logic Pro’s stock Channel EQ is an 8-band equalizer.
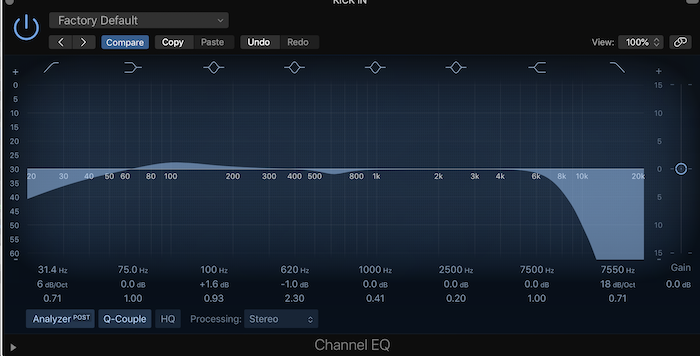

This means there are 8 available ways to boost/cut frequencies at any given time. On either end are high- and low-pass filters, as well as high and low shelving EQs. The remaining 4 bands are Parametric, which are used for boosting/cutting individual frequencies as widely or narrowly as you’d like.
Generally speaking, EQ should be used conservatively. If you find yourself making really drastic boosts or cuts to a signal, this is probably a sign something has gone wrong while recording. Another general EQ tip is to boost frequencies with a broader Q, and cut frequencies with a narrower one.
High-pass filtering is incredibly powerful, so don’t underestimate it! Even gentle filtering around 20 or 30 Hz on low-end instruments like kick drum and bass can carve out a ton of space in your mix!
Using Logic Pro X Stock Compression

Learning how to use a compressor is one of the most important mixing skills you can acquire. Compression is quite literally all over mixes, even becoming the sound we associate with loud, modern pop mixing. If there’s anything you want to really understand, it’s compression and how to use it effectively.
This section of the Logic Pro X tutorial will cover compression fundamentals.
Get familiar with the basic parameters:
Ratio
Ratio settings generally range from 2:1 all the way to 10:1. At 10:1, your compressor has become a limiter, which we won’t delve into just yet. A compressor’s ratio setting is exactly that; it represents a relationship between input signal and output signal.
At 2:1, an input signal of 2 dB will output at 1 dB. An input signal of 10 dB will output as 5 dB, and so on. At a 2:1 ratio, your input signal is being reduced by a factor of 2.
The ratio determines how much a sound is being reduced in volume, i.e., compressed. However, a compressor isn’t working 100% of the time. Gain reduction isn’t applied until the input signal surpasses a user-determined threshold.
Threshold
A compressor doesn’t begin compressing until the input signal goes above its threshold. For example, if we set a compressor’s threshold to -18 dB, nothing below -18 dB will trigger the compressor. Any sound louder than -18 dB will then tell the compressor to start applying gain reduction.
Threshold tells the compressor when to turn on, and ratio determines how much gain reduction to apply.
Generally speaking, we use compression to catch the loudest peaks in our dynamic material. So, setting a threshold that catches and reduces those peaks to make our track level more consistent is the best way to begin. Be thoughtful with threshold; if it’s too high, the compressor won’t do anything at all.

Attack
So far we’ve learned that the ratio dictates how much our input signal is reduced after it passes the threshold. But what exactly happens when the signal does surpass the threshold? Does gain reduction immediately kick in? Not necessarily.
The attack setting controls how much time it takes the compressor to apply gain reduction after the input signal passes the threshold. If we set the attack time to 5 ms, it will take 5 ms for gain reduction to apply after the input signal passes our -18 dB threshold.
Setting the attack time will vary from instrument to instrument, and even from song to song based on tempo and a variety of other factors. Most of the time, slower attack times work well; think somewhere between 20 and 40 ms. A slow attack means the entire note will be compressed after it passes the threshold, rather than just the initial transient. If you want to crush fast transients, say on a snare of rapidly-picked guitar, fast attacks do the trick.
Release
Release is another time setting that determines how quickly the compressor turns off after the signal drops below the threshold. Again, this is a very important setting that ultimately determines how the compression will sound.
If the release is too quick, the audio will start to sound unnatural. If it’s too slow, the compressor never shuts off. Typically with the release time, it’s advised to adjust it until it feels right with the pocket of the sound. A good starting point is somewhere around 60 ms. Where you go from there will depend on the overall rhythmic feel and tempo of the song itself.
Makeup Gain
Because compressors actively reduce volume as determined by the ratio/threshold, our overall track level will be lower than before we applied compression. The easy solution to add back some of the gain that’s been reduced by using the compressor’s “makeup gain” or “output” control.
A general rule of thumb is to increase the makeup gain until the level coming out is equal to the level going in. Or, you can push the makeup gain even more to get more overall level out of a track.
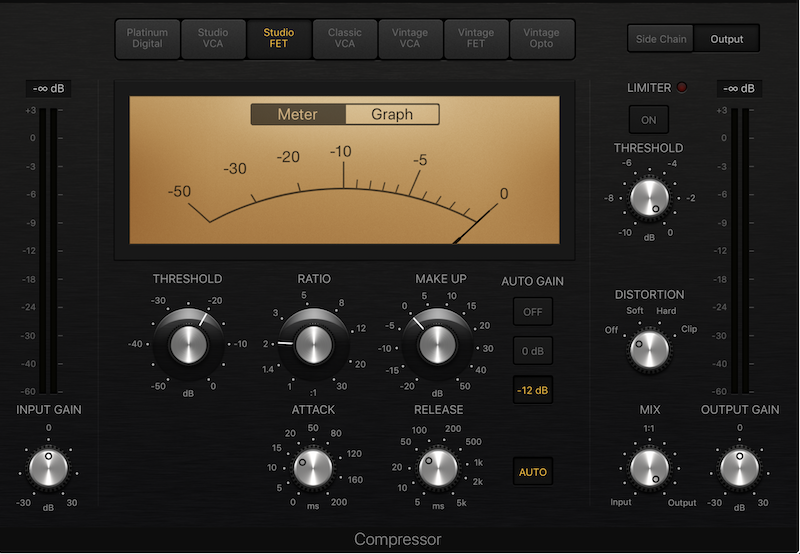
Logic Pro X’s stock compressor is an incredible plugin. It’s really 7 different compressors in one, all based on tried-and-true analogue gear we’ve come to know and love like the 1176 (Studio FET) and LA-2A (Vintage Opto).
Understanding compression basics will help you utilize it effectively on a variety of sound sources. People like to use Studio FET 1176-style compression on things like kick, snare, vocals, and other instruments with lots of transients. Vintage Opto LA-2A-style compression works well for ‘glue’ or buss compression, such as at the end of a vocal chain.
The best thing you can do is try out each of the 7 compressors and get to know which ones you like the most!
Using Logic Pro X Stock Reverb
Logic Pro X makes using reverb very simple, providing users with excellent stock reverb plugins as well as a number of awesome sounding presets. There are a number of different reasons why you’d want to use reverb, and one of them is to give listeners the impression that all of the instruments have been recorded in the same room.
This is what we mean when we talk about creating ‘space’ in a mix, which is both side-to-side width and front-to-back depth.
Set up your reverb using an Aux Return to which you’ll Send tracks.

Rather than putting a reverb plugin directly onto each track, you’ll want to use a Send. Most DAWs require users to manually create Aux Return tracks. In Logic Pro X, simply open the mixer window, select which tracks you want to Send, and choose an available Buss. Logic will automatically create a properly routed Aux Return for you!
You can then rename the Aux Return to which type of reverb you’ll be using, i.e., Room Reverb. Next you’ll want to turn up the Send level on each track, which is easily done by Option-clicking the volume knob next to the Bus in the Mixer. This volume knob determines how much signal is being sent to the Aux Return.
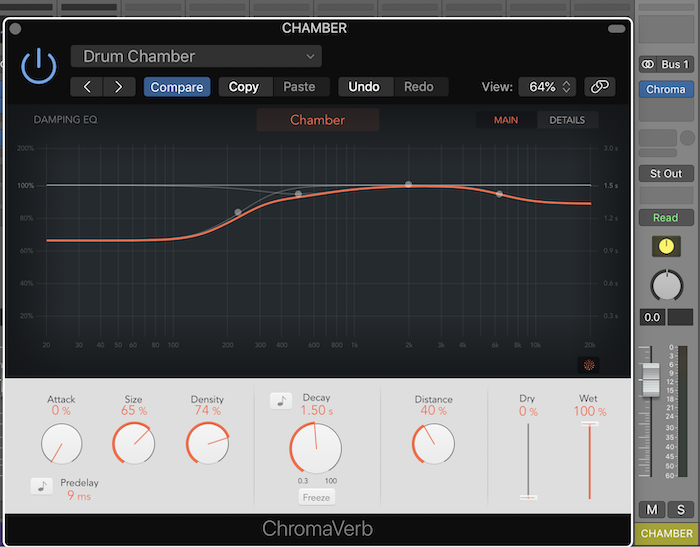
Now you can load up an instance of ChromaVerb, which has really great chamber sound right out of the box.
With ChromaVerb open you want to make sure the Wet signal is at 100%. Have a listen and start blending in the desired amount of reverb using the Aux Return’s fader. You can further adjust the amount of reverb on individual tracks using the Send level.
BONUS: Manually Installing Third-Party Plugins
Assuming you already own a few third-party plugins, this walkthrough will help you install them for the first time. If you don’t already own some, you can visit Bedroom Producers’ Blog, where you’ll find dozens of free VSTs conveniently organized by category. Of course, Logic is a Mac OS-based DAW, so you’ll need to make sure your plugins are Mac compatible. Luckily these days, nearly every plugin developed is cross-platform.
Once you’ve downloaded your plugins, the next step is to manually install them in the system. When you’ve unzipped the download, you should find your plugin in several different formats, like VST, VST3, and Component. Only Audio Units (.component) plugins are compatible with Logic Pro X.
So, you’ll need to use the Audio Unit (.component) version of the downloaded plugin for installation.
You’ll need to copy the Component plugin file into the plugins folder on your computer. The file path is as follows: Macintosh HD > Library > Audio > Plugins > Components.
Simply drag the file into the components folder, and you will have installed the plugin in your system!
We hope this Logic Pro X tutorial was helpful in getting acquainted with mixing workflow and plugins the DAW utilizes.
For more tips & tricks to get you started in Logic, check out: