
Written by Michael W. Dean
Michael W. Dean wrote the book $30 Music School (Only 5 dollars. 2nd Edition, 2018. Cheaper than a drink in a bar, Kindle Edition (Get it here on Amazon)
It’s the 2018 update to the classic 2003 DIY music book $30 Music School, a 540-page paperback that retailed for $30.
This article is an excerpt from the 2018 update.
IK Multimedia, who make Lurssen Mastering Console, had their tech department go through this article and confirm that it’s accurate.
When I wrote the second edition of this book, I put in a section on LANDR cloud mastering service, and really thought it was a very cool development in music technology. But after that edition went live, I discovered something new and less expensive that has advantages over LANDR, and that thing is Lurssen Mastering Console, commonly known as LMC.
You can try the demo and buy the program on the Lurssen site here. The demo is fully functional. But after ten days, it will add random white noise a few places in each output file.
LMC is a 64-bit program and requires a 64-bit operating system, either Windows, or Mac.
There is also a version for iPad.
LMC was created by IK Multimedia in cooperation with mastering engineer extraordinaire, Gavin Lurssen, and mastering engineer Reuben Cohen.
Gavin Lurssen has won five Grammy Awards for his mastering work on hit records.
LMC basically takes Gavin and Reuben’s mastering set up and style, and puts it in a software program.
I mean, if you can afford it, it’s going to sound a little better to have Gavin and Reuben actually master your song by hand in their studio with their hardware gear and decades of combined experience. But you can get pretty close with LMC.
Not sure what their rates are. But based on my experiences with hiring professional mastering engineers back in the day (George Horn at Fantasy in Berkeley, also Record Plant Studios in NYC, when that existed), I can guarantee any top-notch pro mastering engineer is going to charge well more to master one song than LMC costs to own and use to master every song you ever record, forever.
I think this is a great product offering an unlimited mastering service they’re offering, at a very reasonable price….At a time when many mastering engineers would consider something like this direct competition.
IK Multimedia and Lurssen Mastering are smart. They see the future.
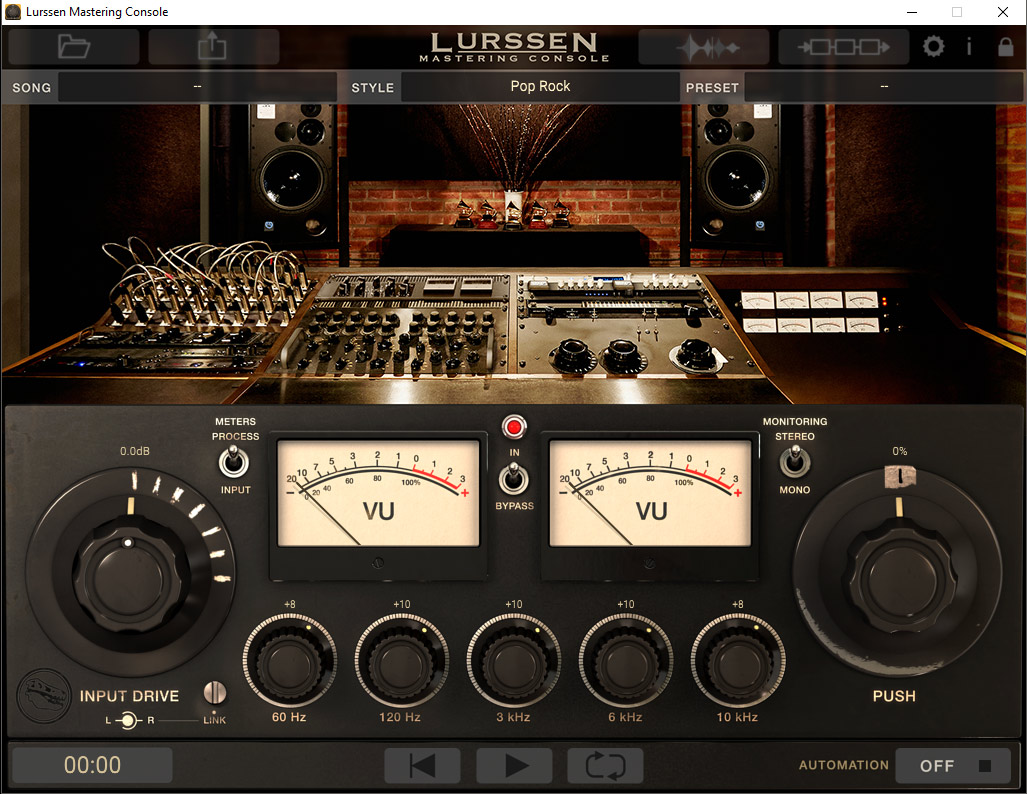
You can see Gavin Lurssen’s five Grammys in LMC’s interface, above. The very cool GUI is based on the look and gear of his actual mastering studio in beautiful, sunny, downtown Burbank, California.
In the top middle of that interface, those are his Grammys on the table.
IK Multimedia, the site that exclusively sells LMC is a very musician-friendly small business, run by musicians. The guy I deal with there, Dave Kerzner, makes amazing music.
Dave’s music is prog rock, but stripped-down, lean, and catchy. He’s worked with Neil Peart, Keith Emerson, Tom Waits, Smashing Pumpkin, and with members of Genesis and Yes. Check out Dave’s YouTube channel here.
LURSSEN MASTERING CONSOLE COMPARED TO LANDR
Unlike LANDR, Lurssen Mastering Console is NOT a cloud service.
LMC is a program that lives on your computer. So you don’t have to spend time uploading and downloading your media.
Lurssen Mastering Console costs $159. For life. The only version sold is the HD audio version.
LANDR costs $300 per year for the full HD version.
In addition to the time you have to spend uploading and downloading large files from LANDR, there is sometimes a wait time on LANDR even after you upload. Sometimes LANDR masters right away, sometimes it takes a few minutes. It depends on how busy they are. And also seems to take longer after you master different mixes of the same song a few times in a short period of time.
LANDR has almost zero learning curve. LANDR is a one-click fix with only 3 settings. And I always use the “high” setting. But it is expensive.
The one thing LANDR does well is it will always make a good master with zero effort.
LMC can make a good, or even great, master, but it might take just a little work to initially learn your way around it. It was intentionally designed to be very easy for anyone to use yet it actually gives you a lot more control on your mix than LANDR.
And LMC is half the price, for life, of what LANDR is for a single year.
Plus LMC also gives you a better understanding of what the mastering process actually is by showing the interface.
LMC has many presets, and from within those presets, you can also change things and then save your own custom presets.
NOTE: this tutorial is for using LMC as a freestanding program. But buying the program also includes a VST version that you can launch like any VST directly from within your DAW.
But I prefer mastering outside the DAW, for two reasons: First, to have more memory available. Second, there is something psychologically useful to having the audio exported as a stereo file before mastering, and also not having all the options you’d have in a DAW.
This forces you to mix in a way to get to a stereo file that works. You may prefer mastering in the DAW. But if so, give it a try mastering outside the DAW.
I’ve actually had great results outputting my final stereo mix from my DAW, then I drag it into Izotope Ozone. Ozone is, in and of itself, a mastering utiliy. But I don’t use the complete program, I only use it to EQ my master to the pink noise curve. Then I export the output from that, and master it in Lurssen Mastering Console.
Here’s the Produce Like a Pro article on mixing to pink noise. And here’s a YouTube video on doing it that is specific to Ozone.
GETTING STARTED WITH LMC
Unless you’re on a very slow computer, I’d change a few settings right off the bat. Go into Settings (the little gear on the top right of the interface, red arrow I added shows it below), and you’ll get this window:
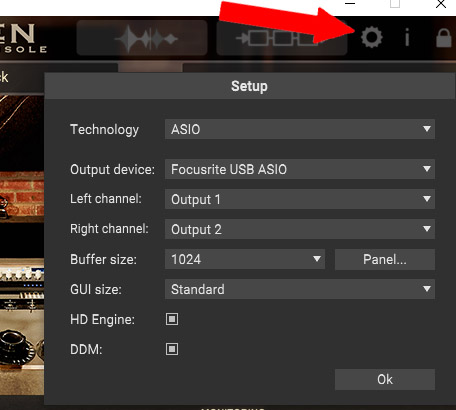
Under Output Device, pick your best sound card or external audio interface breakout box. Above that, under Technology, pick the highest quality sound mode available for your sound card in that drop-down menu.
What shows will vary on your sound card, but pick ASIO if you have it. ASIO is the best available for Windows with the highest audio quality and lowest latency.
If ASIO is not an option, pick WASAPI.
If WASAPI is not available, settle for DirectSound. (Then make a note to work toward getting a better sound card.)
Next, set the Buffer Size to 512. If this ends up causing latency, lower it incrementally. I run it at 1024, which works the best, but may take a second to start playing when testing a setting in the sound.
Then tick both of the small boxes below, enabling HD Engine and DDM. These use more computer memory, but will make a better mix. And enabling both (if you have an i7 processor or faster, and enough memory, probably 16 Gb or more) will help make mixes that conform to the coveted “Mastered for iTunes” tag when you put your music on iTunes.
Songs with that tag show up higher in iTunes searches.
Almost all hit songs are Mastered for iTunes.
The hit “OK.”
MASTERING WITH LMC
As with all mastering, you’ll want to use the highest quality audio you can.
You can drag an MP3 into LMC, but that’s not recommended. Instead, output your song from your DAW as a stereo WAV, 44.1 hz sample rate (unless you’re producing for film and specifically told they need 48 hz) and a bit-depth of either 24-bit, 32-bit, or 96-bit.
I use 44.1 hz at 24-bit.
There is debate as to whether higher than that is even perceptible by any human ear. Though you will get a lower noise floor. But noise isn’t a noticeable problem to my super kitty ears in my music, because I keep everything smart.
So 44.1 hz at 24-bit is good enough for me and I don’t want to deal with the higher demands on my system, and the larger files to move around and store.
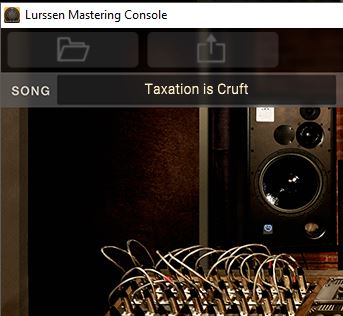
So, drag your final mix as a stereo high-quality WAV and drop it on LMC’s open interface. You’ll see the file name appear in the upper left of the LMC GUI:
Notice that in the middle top of the GUI, there’s a drop-down menu with a list of mastering style presets:
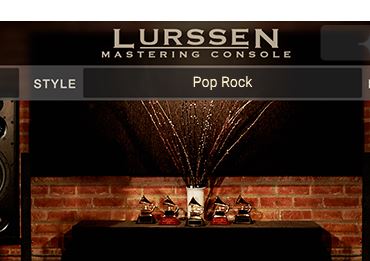

Click on that and you’re presented with a long alphabetical list of mastering presets to choose from:

The list shows various styles of music, with various options (Warmer, Brighter, More Glue, Less Glue).
“Glue” in this sense, is explained thus in the LMC manual:
4.1.5 Solid State Compressor
The last processor in the mastering chain is the solid state compressor.
The model is based around one of the most popular and widely used mix bus compressor designs in the industry.
Though not very common in mastering situations, it finds its niche in Lurssen’s own signature sound, and with the proper settings, it gives the master than universally acclaimed “Glue” effect, making the program more cohesive.
MASTER IT
To master a song, pick a preset and listen. You listen to how it will sound exported after mastering by hitting the Play button, the right-facing white arrow at the bottom middle of the GUI:

Listen and see if you like the sound. Then export by clicking on the box indicated below by my added red arrow:

This will open up the Export interface shown above. Pick your download location (use the browse button if you need to), pick the same Format Project, Sample Rate, and Bit Depth as your original song.
Then hit Export.
(Do NOT check “Dithering” unless you want that for some reason.)
A new file will be created. The new file will have the text
_Master
added to the file name.
That is, if the unmastered file is named
Taxation is Cruft
the mastered file will be
Taxation is Cruft_Master
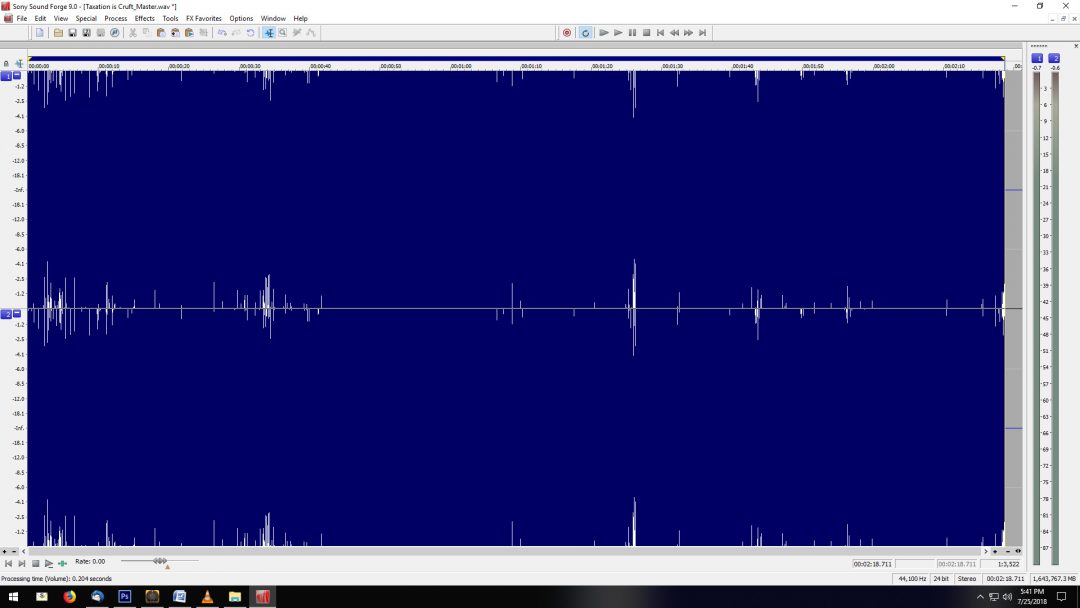
Open your mastered song in a WAV editor program, like Sound Forge or Audacity. That way you can listen as well as do a visual A/B comparison.
PRO TIP: Experiment with presets outside what you’d expect would be correct. I’ve had very good luck mastering synth pop with the Metal (More Glue) setting.
And I’ve gotten good results mastering ambient music with the Hip-Hop (Warmer) setting.
For my examples here, I used a very wide stereo separation in my example, just so you can tell the difference between the channels more in the before and after, to see what different mastering settings do to different types of audio. I wouldn’t normally mix a song with that much difference between tracks for the whole program.
I also mixed my example song with a lot of dynamics on the drums to better illustrate the mastering. In practice, I’d add a little multiband compression on these drums before exporting to my final file that I would then master.
But don’t over-compress, as the mastering adds some (intelligent) compression also. And compressing compression often yields poor results. Crunchy at worst and “pumping” at best. Basically, unless it’s being used as an effect, compression shouldn’t be noticed. But NOT using it would be noticed.
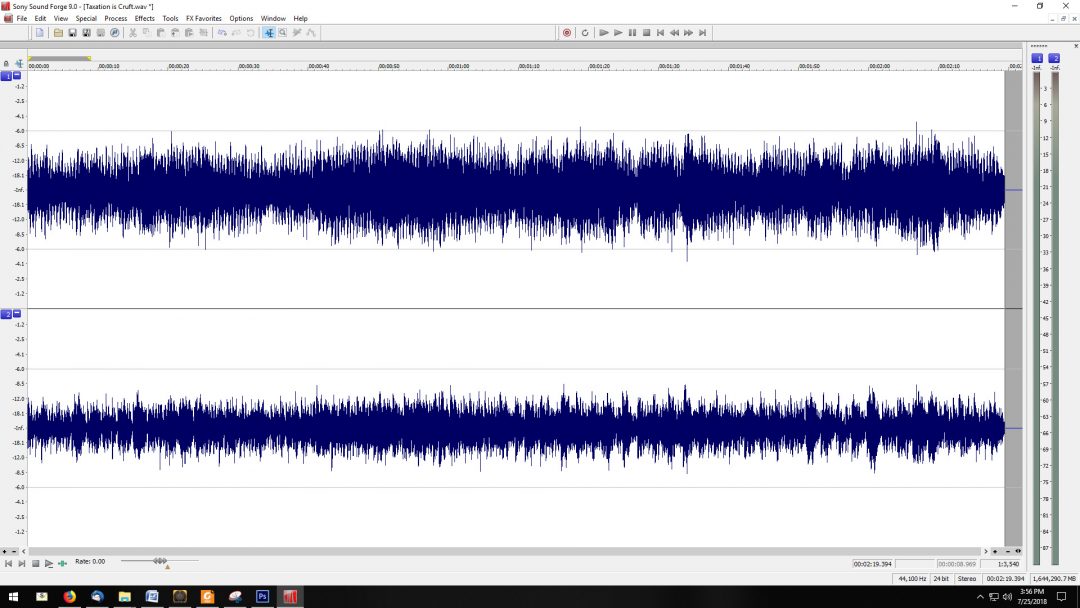
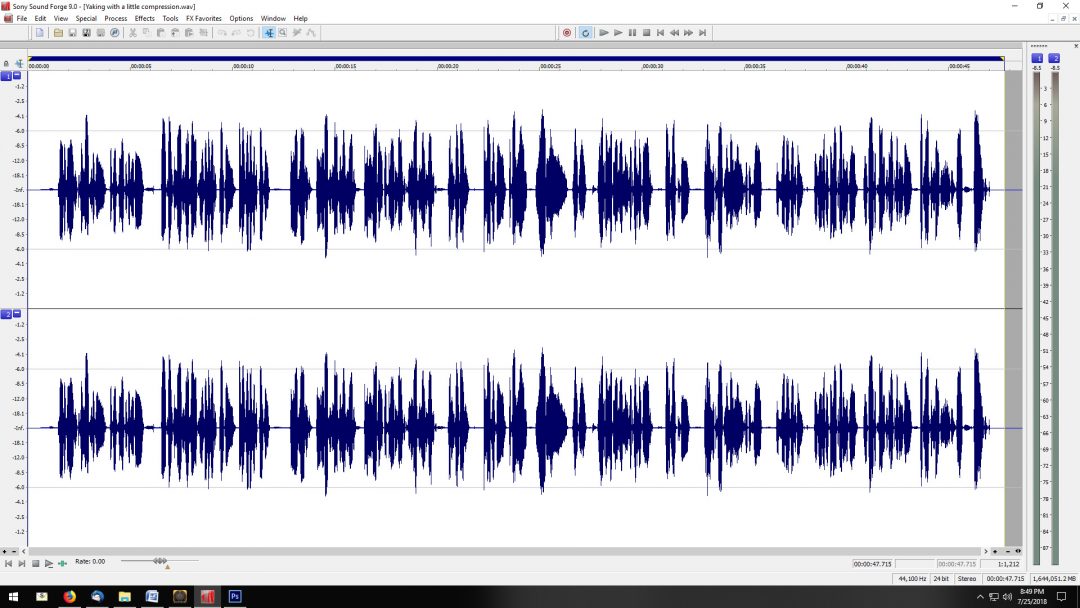
PRO TIP: Make sure your pre-mastered song has lots of headroom. Don’t make the volume way high. The volume I show in the “Before” image below is a good amount of pre-mastering headroom.
Here’s the song before mastering:
Here’s the song after mastering in LMC with the EDM (More Glue) preset:

You can also change the settings and save your own custom presets.
I recommend trying a few of the default presets, listen to the results, and look at your waveforms. But then try making and saving a few presets of your own.
PUSH
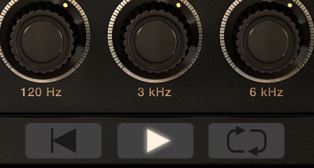
The Push button is an interesting and useful feature that you can use to turn all five bands of the EQ at the bottom of the interface at the same time:
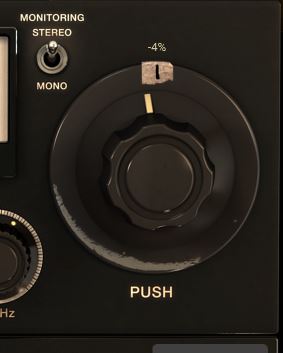
I love to experiment with this.
Also note the toggle switch to the top left of Push, for monitoring in Mono.
Try switching that to Mono. Basically the reason for this switch is this immutable fact: If your mix & your master sound good in mono, your master will sound good on any system, from the cheapest to the most expensive.”
Here’s a mix I did using the EDM setting with PUSH up to 91. This sounds very good on heavy electronic music, even if it has some real drum sounds mixed in:
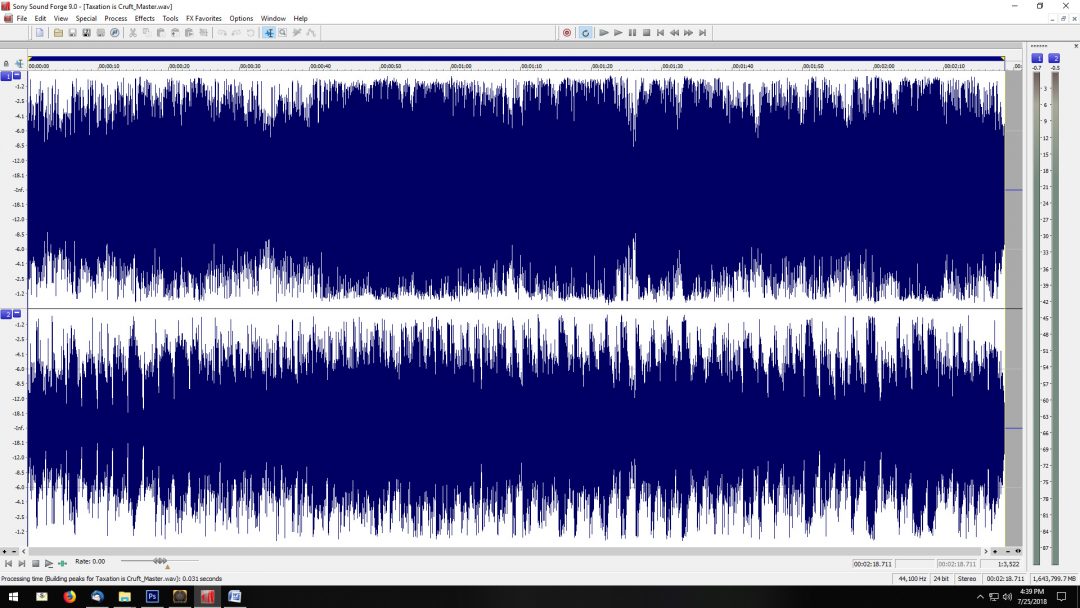
It’s a lot more dynamically steady, it’s a really good volume, EQ, feel and “Glue.” But without getting into “Loudness War” territory, which sounds terrible, and would look (and sound) like a brick, which is bad. Like this:
When you make a preset you like, you can save it, from the top-right menu:
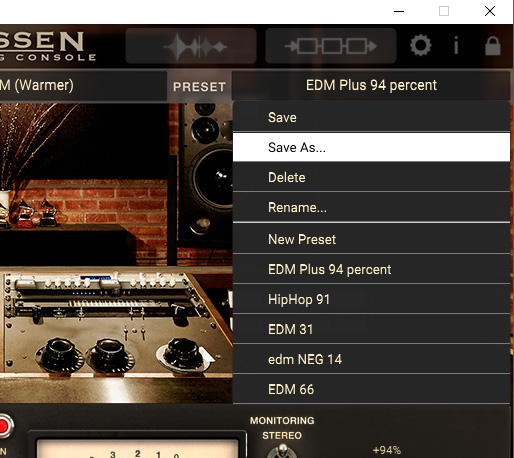
And that’s the same place you’ll go to call up the setting later when you want to use it.
You can give your preset a boring descriptive name like I do (the stock preset name plus added amount of Push, like HipHop 91), or something that makes sense to you, like That One Autumn Day or Brain Under A Boot.
It’s all good, as long as you will know what it means two or five years from now.
You can view the waveform of the pre-mastered audio by clicking the box I show here with the added red arrow:
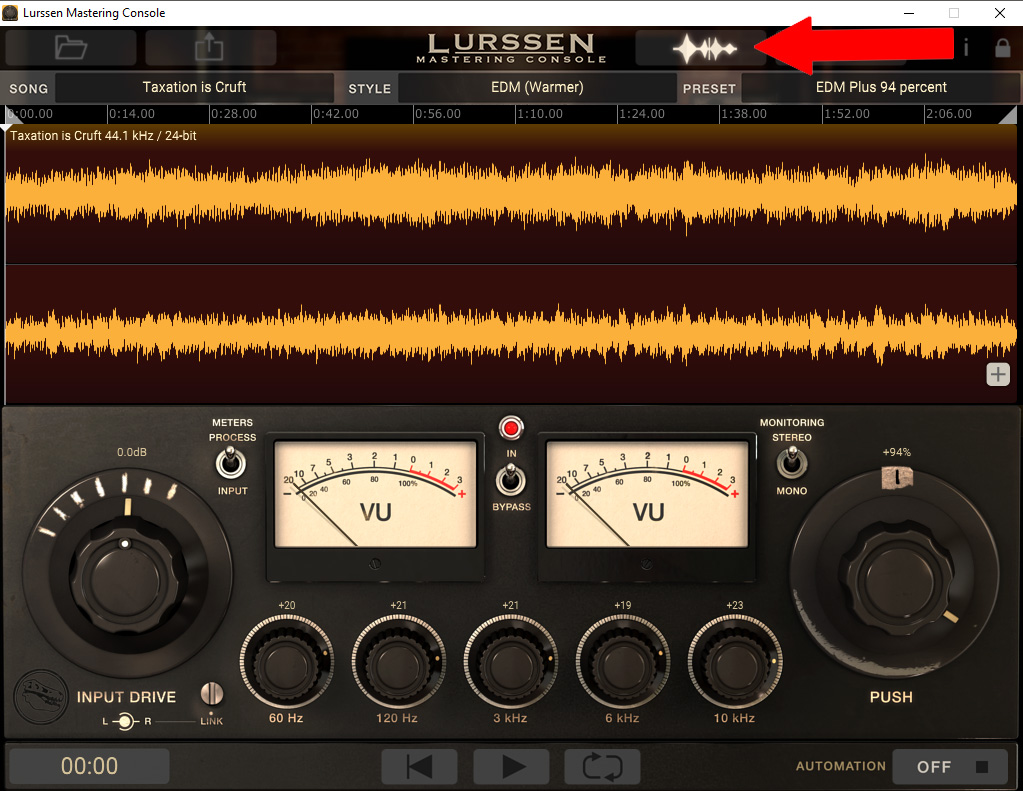
But you cannot view the mastered version’s waveform without exporting and viewing in an external program.
I would LOVE to see this feature added, where you can see both the Before and After waveform superimposed different colors for comparison. This is one place LANDR shines over LMC. They have it.
Let’s do it, guys. Can you add this to LMC, pretty please?
CHAIN SIGNAL
You can also view a visual representation of the virtual signal chain that’s processing your program in a particular setting, by clicking on the box shown here with the added red arrow:
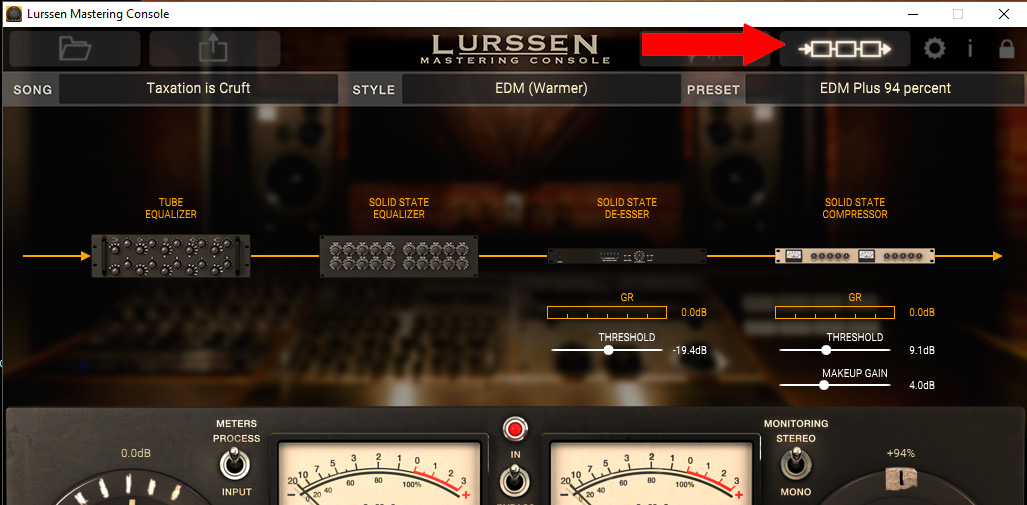
This is a VERY cool feature, and helps you to more understand what mastering actually is and what it does.
Notice that not every component is engaged on every setting, and the values on each component change also with different settings.
You can also do automation in LMC, where you change the presets while the song progresses. That has a learning curve, and requires more reading, and testing, so is out of
the scope of this short tutorial. But it is covered in the extensive and detailed PDF manual that comes with the program.
SAVING THE PROJECT AND EXITING
When you go to exit LMC, you get this window:


Just drag your spoken audio in and master as you would a song.
From there you can save the project, but I really wish this could be toggled to not come up. 98% of the time, I master one song, don’t need to save the project, and it’s just another step. But it’s only a small bother. Still, would be nice to be able to change a setting so this never comes up again.
UNDOCUMENTED BONUS: MASTERING SPOKEN AUDIO FOR COMMERCIALS OR PODCASTS
Fun fact I figured out: you can master well-recorded spoken audio in LMC and it works great.
Here’s a bit of me talking, Unmastered (but with a tiny touch of hardware compression):
Here’s that mastered with the LMC’s first default, Pop Rock setting:
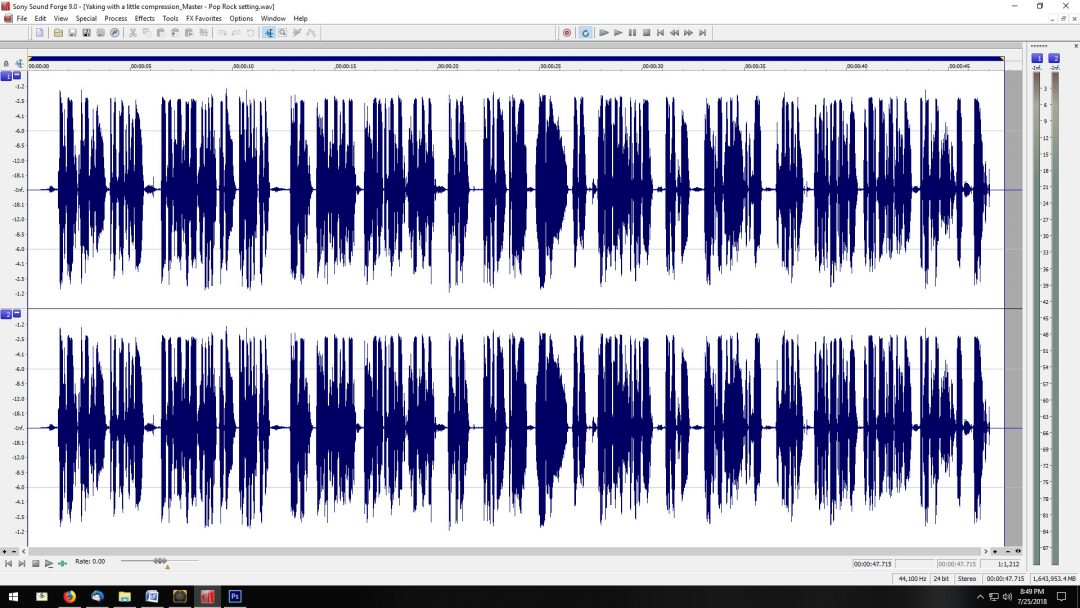
That sounds better.
Even better than that is instead choosing one of my custom defaults, EDM 66, which is the EDM basic stock setting, with the Push at 66:
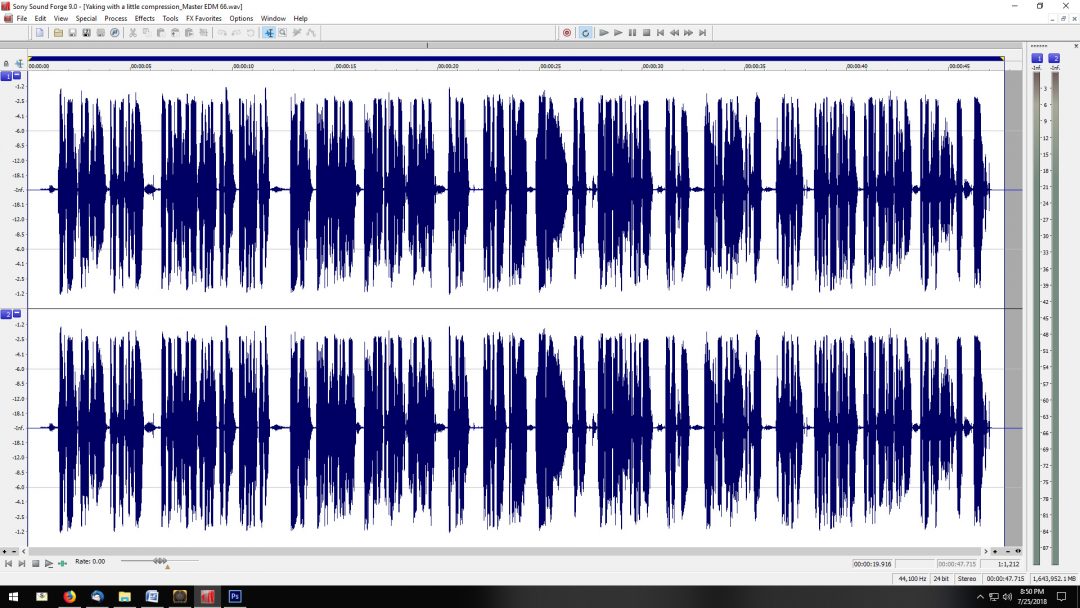
This sounds very “Creamy Radio Audio.” Almost booming, but not muddy at all, very…commanding and authoritative. This really works for podcasts or radio, especially if the content is on an educational topi that will benefit from a strong sounding voice.
It makes my 100 dollar condenser mic sound like a 500 dollar RE-20 dynamic mic, the default for DJs and talkers in well-funded radio studios.
PRO TIP FOR AFTER YOU MASTER:
Put 1/4 second of silence at the beginning of every song you release.
It takes most audio players a little less than that to get going. That way people won’t cut off the first note when they click on your song, or when it goes from one song to the next on a web player.
CODA
All in all, LMC is a great product at a great price. I use it every time I do a song, for the final master.
I still use LANDR, when I need a quick and dirty rough master to show a few friends. But I’ll take a little more effort with a final master, and use Lurssen Mastering Console.
LANDR is great if you have the money, and don’t have the time or ear to work on learning a little bit about mastering. LMC is great if you have more time to learn at first, and want to have more control over your mixes.
Lurssen Mastering Console is also GREAT if you don’t have a lot of money to pay each year for LANDR.
But the bottom line is this: because I have Lurssen Mastering Console, I will probably NOT be renewing my LANDR subscription when it expires in a few months.
IK Multimedia also makes and sells the $200 Uno Synth, which looks amazing for the price.
It’s a full analog synth, small package, doesn’t require a computer, and even runs on batteries so you can go to the park or the coffee shop with headphones and play synthesizer. Or jam in the tour van without bugging your sleeping band mates.
The Uno Synth also has some cool built-in effects.
Watch Uno Synth demo video.
Buy the Uno Synth.
ABOUT THE AUTHOR:
Michael W. Dean plays in the heavy synth rock project, BipTunia. He used to play in the Warner Brothers band, Bomb. (Produced by Bill Laswell.)
Michael directed the film Hubert Selby Jr: It/ll Be Better Tomorrow, did some of the music for that film, and for other films.
He has toured Europe lecturing on & teaching film and audio production.
Michael does the syndicated radio show, Freedom Feens. He also runs the site Creamy Radio Audio, which has tutorials on getting great spoken audio on almost no money.
In his spare time Michael hangs out with his wife & cats, and makes VST synths.
He also has written some books and done some other stuff that’s not music related.