
Today, we will be going over the basics of mixing drums.
We’re back with another episode of Mixing Basics. In this episode, we’re going to get into the basics of mixing Drums.
If you recall in the previous episodes, we balanced the mix using panning and volume and got the mix to a place where we could start making better decisions. then took a look at some really subtle ways you can make your vocals sit better in a mix using compression and automation.
Check out our previous episodes from the Mixing basic series below.
The Basics of Starting a Mix – Setting Levels
Mixing Basics: Vocal Compression
We have a song by Me And The City called “The Owl Song” this is actually a song we have used in the academy. So those of you who are academy members will know this song very well. but for those of you who aren’t in the academy yet heres a little more info.
Me and The City are a Indie/Folk band out of Southern California. What started as a one man project, Me and the City has grown into a 4 person adventure. Having a unique sound of both electric and acoustic elements that can’t be described with one word, they have crafted a unique experience both on and off the stage.
Download Me and the City – “Owl Song” Multitracks here

With the full mix open we’re going to listen to the first chorus both in the track and in Solo. – It sounds good but it doesn’t sound quite aggressive enough to cut through the mix.
We’re not trying to make it sound like Death metal or anything we just want a little more bit on the kick. A little bit more snap on the snare top and a little more low end on the kick as well for a little more oomph down there between 40-60hz.
Here are the basic things that I would do in every mix. I’ve zoomed into the front of these kick elements and I can tell that the addictive Kick – the sample we laid in there are actually exactly out of phase. So what I’m going to do it take my addictive kick and reverse the polarity (invert the phase).
You can immediately hear a difference, The low end is lined up a little better. It’s never going to be perfect because it is a sample. If you have a look you will see the areas which need to be inverted. Doing that will give us more low end.
You could invert the whole file by highlighting it and invert the polarity so they look the same. or you can just use a plugin like I have done.
Now the phase is close and the polarity is the same – it’s near as darn it.
What I’m going to do now is bus those 2 elements together. The sample we used is stereo because it probably has a little bit of ambient on it. Not all samples need to be in stereo but this particular one is and we’re going to preserve that.
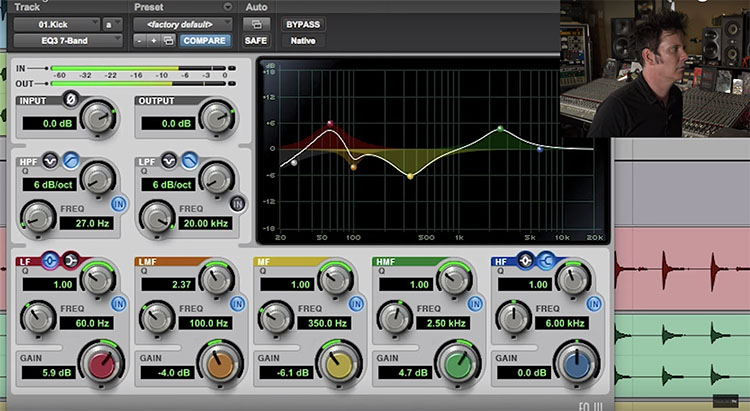
I could individually EQ the Elements of I could EQ them as a group. I’m going to listen to the live kick drum on its own. – It’s pretty unexciting so we’re going to make it a little more exciting.
Grabbing a stock EQ plugin and go to 60hz and boost around that area. Next, I’m going to engage some High-pass and that is going to tighten that low boost. One problem that I come across when I’m boosting the low end of kick drums is it gets a bit of a build-up the 100ish area which doesn’t sound like that big of a deal but 100 is where the bass guitar is going to sit.
With Drums particularly there are some ugly frequencies around 300-400hz some might say they go down to 250 but for our sake of argument, we’re going to go around 350hz and cut quite dramatically. There is not a lot of aggressiveness in that kick that is why we’re using the sample.
Watch the full Mixing Basics video below.
