
Learning to use a compressor is one of the most important mixing skills you can develop. Compression is all over mixes, even becoming the sound we associate with loud, modern pop mixing. If there’s anything you want to really understand, it’s that! You’ll be using it on practically everything, so get to know it well. The same goes for a multiband compressor, which can be a little tricky to use if you haven’t done it before.

How to Use a Multiband Compressor
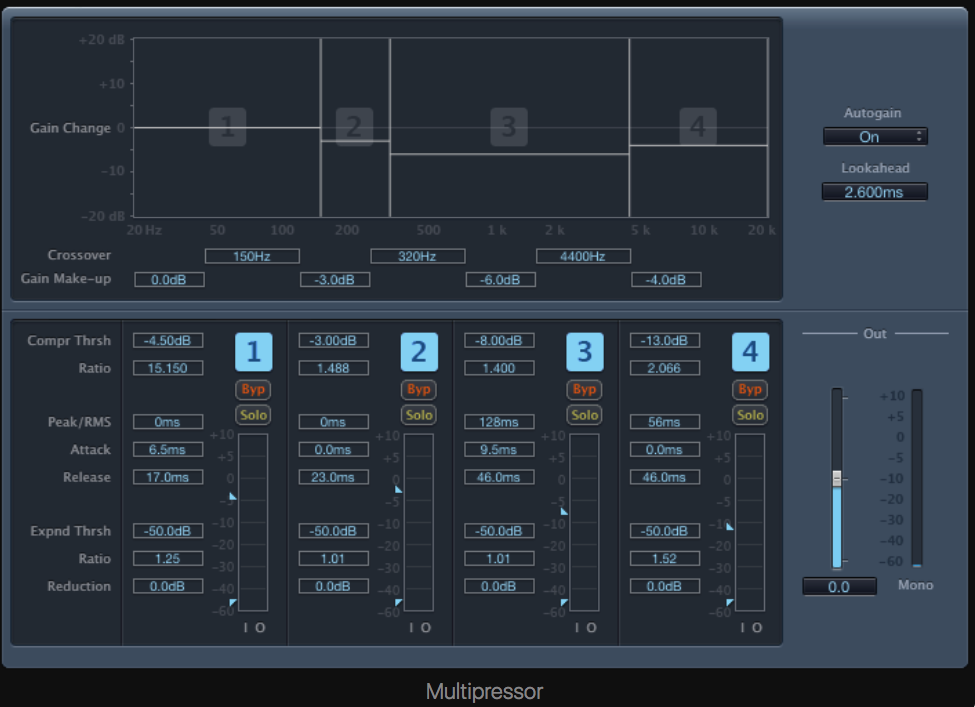
A multiband compressor works the same way a regular one does, with one key difference: multiband compressors work on a specific set of frequency ranges—not the whole track. We’ve included a handy breakdown of compression parameters at the end if you need a refresher. You’ll find that a multiband compressor shares many of these exact same parameters with regular ones as well.
Before applying a multiband compressor, you should have a clear purpose.
Multiband is one of these tools that can absolutely destroy a track or a mix very quickly. GRAMMY-nominated mastering engineer Michael Romanowski even told us you shouldn’t use it at all if you plan to send your mix to be mastered by someone else! Multiband can really “slam” things or even suck the life out of a track. On a mix bus especially, you can run into a lot of trouble with pumping and things sounding downright awful. So before you use a multiband compressor, you’ll want to decide what you’re trying to achieve.
The Basic Purpose of Multiband Compression
- To control dynamics
- To control frequencies
The first approach uses multiband like a regular compressor, but for specific frequencies as we’ve mentioned. Think of it like this: let’s say you wanted to even out the lowest frequencies in a kick drum, up to about 200 Hz. With multiband, you could apply compression from 0 to 200 Hz, evening out the low end to make it consistent. Applying additional makeup gain on the chosen frequency band will make it stand out, so you’re left with a hard-hitting and even kick sound in the low end.

The second approach to multiband compression is using it to tame unpleasant frequencies. You could use an EQ and notch for days, but you might also be removing some of the naturalness of an instrument or causing unwanted phase problems in the long run. With a multiband compressor, you can tame harsh frequencies only when they become a problem. You’re not removing them outright, but instead tucking them in when they surpass the threshold. In this case, you wouldn’t want to apply any makeup gain—we’re turning the nasty parts down!
Multiband Compressor Settings
Remember how we said multiband can wreak havoc on a mix? For the most part, you’ll want to be pretty conservative with your settings—moreso than with a regular compressor.
- Threshold: Low for controlling dynamics and high for taming frequencies
- Ratio: Low. 2:1 is great
- Attack: Try somewhere around 20 ms
- Release: Try somewhere around 100 ms
- Gain: Level match for evenness as in the first approach, or turn it down to control harsh frequencies as in the second approach
Basic Compressor Parameters
Most compressors share 5 common parameters: ratio, threshold, attack, release, and makeup gain. It’s important to first understand how these work, so that you can make informed decisions rather than blindly twisting knobs (not that that’s a bad thing!). Typically, you’ll find all or most of these on a multiband compressor too.
Ratio
Ratio settings generally range from 2:1 all the way to 100:1 in certain plugins. At 10:1, your compressor becomes a limiter, which we won’t delve into just yet. A compressor’s ratio setting is exactly that; it represents a relationship between input signal and output signal.
At 2:1, an input signal of 2 dB will output 1 dB. An input signal of 10 dB will output 5 dB, and so on. At a 2:1 ratio, your input signal is being reduced by a factor of 2. The same logic is applied to different ratios.
The ratio determines how much a sound is being reduced in volume, i.e., compressed. However, a compressor isn’t working 100% of the time. Gain reduction isn’t applied until the input signal surpasses a user-determined threshold.
Threshold
A compressor doesn’t begin compressing until the input signal goes above its threshold. For example, if we set a compressor’s threshold to -18 dB, nothing below -18 dB will trigger the compressor. Any sound louder than -18 dB will then tell the compressor to start applying gain reduction.
Threshold tells the compressor when to turn on, and ratio determines how much gain reduction to apply.
Generally speaking, we use compression to catch the loudest peaks in our dynamic material. So, setting a threshold that catches and reduces those peaks to make our track level more consistent is the best way to begin. Be thoughtful with threshold; if it’s too high, the compressor won’t do anything at all.

Attack
So far we’ve learned that the ratio dictates how much our input signal is reduced after it passes the threshold. But what exactly happens when the signal does surpass the threshold? Does gain reduction immediately kick in? Not necessarily.
The attack setting controls how much time it takes the compressor to apply gain reduction after the input signal passes the threshold. If we set the attack time to 5 ms, it will take 5 ms for gain reduction to apply after the input signal passes our -18 dB threshold.
Setting the attack time will vary from instrument to instrument, and even from song to song based on tempo and a variety of other factors. Most of the time, slower attack times work well; think somewhere between 20 and 40 ms. A slow attack means the entire note will be compressed after it passes the threshold, rather than just the initial transient. If you want to crush fast transients, say on a snare of rapidly-picked guitar, fast attacks do the trick.
Release
Release is another time setting that determines how quickly the compressor turns off after the signal drops below the threshold. Again, this is a very important setting that ultimately determines how the compression will sound.
If the release is too quick, the audio will start to sound unnatural. If it’s too slow, the compressor never shuts off. Typically with the release time, it’s advised to adjust it until it feels right with the pocket of the sound. A good starting point is somewhere around 60 ms. Where you go from there will depend on the overall rhythmic feel and tempo of the song itself.
Gain
Because compressors actively reduce volume as determined by the ratio/threshold, our overall track level will be lower than before we applied compression. The easy solution to add back some of the gain that’s been reduced by using the compressor’s “makeup gain” or “output” control.
A general rule of thumb is to increase the makeup gain until the level coming out is equal to the level going in. Or, you can push the makeup gain even more to get more overall level out of a track.