
Reamping. It may be a basic part of your recording process already, or it might be something that you’re just starting to dip your toes into. Even if you’re deep into the reamping game, it’s always good to get a debrief and reminder on why processes help elevate your workflow in the studio.
So get ready, because we’re going to go over the basics, process, and benefits of reamping, and why it could be the very thing that elevates your creative process.
3 Big Reasons Why We Reamp
- ? We reamp so we can focus on our playing first. Think about it– to get that “perfect” part, we want to focus on things like feel, tone, and quality performance before anything else. Once we have those, we can have a ton of fun hearing ourselves play it back and fiddling with amps and pedals while we sip a cup of our favorite tea (or another drink of choice).
- ⌚️ We reamp when we’re in a time crunch. When you’re a producer working with an artist, we should remember that it’s always best practice to split the musician’s signal with a DI to capture a clean recording, especially when they have limited time or budget with you. But when you know you can reamp after, setting them up with a basic amp, effect or modeling plug-in allows them to be in the zone and focus on the quality of parts while recording. That alleviates the stress and pressure of getting the “perfect” sound, which can be accomplished by reamping their direct signal… after they’re done.
- ? We reamp to leave more control for the producer. As multi-instrumentalists and remote studio musicians, we might not know what sound our producer is looking for. Nailing our performance through a DI allows us the mental and emotional freedom to work with their input, and finding those sounds via different amps and pedals, rather than playing it over 20 different times. Additionally, if you don’t have the proper set-up for that producer, they can reamp your direct performance that you worked hard on.
Reamping leaves you a ton of options to try out sounds and have fun with the parts you recorded once you get it nailed down. It’s great for flow, and for when you’re working by yourself on parts. So, let’s get into the simple steps of how to do it.
Related: JamKazam Review: Collaborate Remotely
How to Prepare for Your Reamp
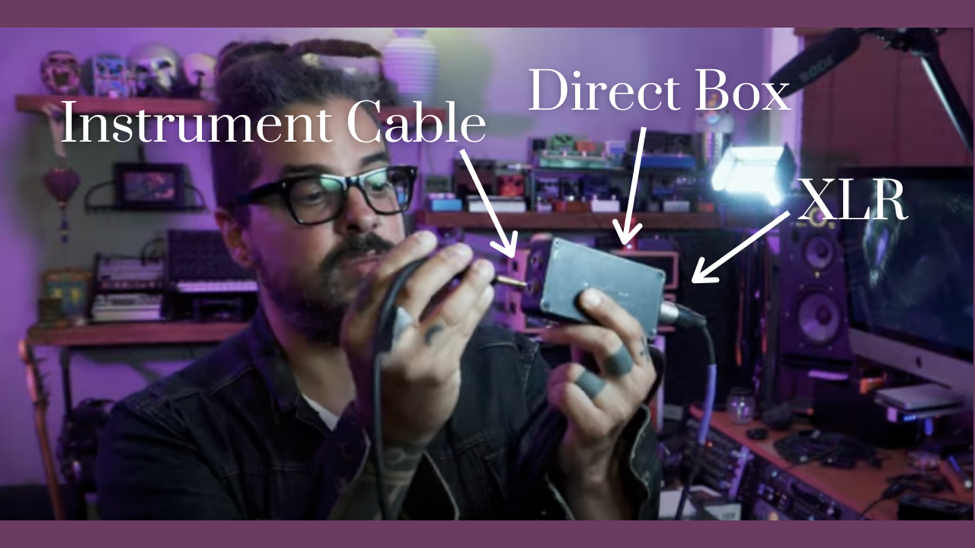
First, grab your direct box. Plug your XLR out of your direct box, into one of your cleaner preamps.
Then, plug your instrument cable into the input of your direct box. This’ll be the same instrument cable that you connect to your guitar or bass.
At this point, if you want, you can take a second instrument cable out of the direct box that goes into your amp and/or pedals, so you can simultaneously capture a direct clean recording and your amp. For this video, I chose to capture solely my direct signal.

How to Reamp
First, you have to figure out where your line outputs are on your interface. If you have line outputs that require a quarter inch TRS connection like I have with the interface I used in the video (the Apollo Twin MkII), then you’ll plug the quarter inch TRS into that direct out. The other side of that cable– your XLR male– goes into the XLR female input of the reamp box.
Then from the reamp box, you connect an instrument cable to the output of the reamp box that will then go into your pedals and/or amp.
Now, for routing in your DAW:
Some of these details may vary DAW to DAW, but the basics should apply. On the track that your direct instrument was recorded to, assign its output or utilize an auxiliary send to the same line output that you plugged your TRS cable into.
Then, create an additional track to record whatever it is that you’ll reamp.
Now, you’re ready to roll!
DAW ➡️ line output ➡️ reamp box ➡️ amp/pedal
By the way, the reamp box I chose to use was the Radial JCR 1-Channel Passive Reamp, which I got from my friends over at Sweetwater. While there are a ton of reamp boxes in different price points with various features, I particularly like the JCR-1 for its output attenuation.
Playing Around With Sounds
My initial intention for this song was for it to live somewhere sonically within late ‘60s funk; The Meters meets Band of Gypsies. Because of my time crunch with the Blues Buddha, the singer, I quickly recorded direct bass and two direct guitars to a simple drum loop, had him sing, and then performed live drums once he was gone.
At this point, I was able to take my time and find all of the tones that were pleasing to my ears and that suited the song best. I was even able to perform my pedal changes and wah-wah during the guitar solo… all while reamping!
During this whole reamping process, since all of the performances were captured already, I was able to experiment with a number of different sounds and sonic choices; and at one moment even, cranking up all the gain, creating some heavy rock tones within this funky blues track!
Related: The Best DAWs for Beginners is Whichever You Choose!
With reamping, you can go into a song trying to sound like The Meters, and end up leaving sounding like Rage Against the Machine. The key is knowing that what you’re reamping is already your heartfelt performance and that the reamping process is a sonic icing on the cake of a day well spent recording.
Want to experiment with reamping on your own? Click here for the multitracks of the song heard in our video, “What Kinda Fool,” by the Blues Buddha to play around with it on your reamping setups.
Until then, stay inspired, stay creative, and I’ll see you next time. ??
Produce Like a Pro
Written By: STATiC | Kira Gavalakis
Watch the video below to learn more about Re-Amping with STATiC!