
One of the ways mixers and mastering engineers optimize their levels is by referencing detailed loudness meters. Whether you’re mixing for film, TV, or digital streaming services, there are different standards you can aim for to make sure your mix translates when it gets to its destination. Youlean Loudness Meter is a great plugin which can help tremendously.
Now, most of us are mixing music, and in this day and age, our songs will inevitably end up on a digital streaming service like Spotify or Apple Music. It’s possible that when the song is uploaded, it doesn’t quite sound as good as it did originally. The problem could be that the overall loudness exceeds Spotify’s “sweet spot,” so they went ahead and turned your mix down. They might have compressed it a bit, so now the dynamic range is off—a lot could go wrong.
Obviously, this is pretty discouraging. All that work you did was for naught. However, if you have a loudness meter to reference, you can see where your mix/master is landing compared to a standard, and compensate before it ever hits a streaming service.
Now here’s something that might sound counterintuitive: many engineers will probably say you shouldn’t mix “for” a streaming service. That is, your sole purpose shouldn’t be to hit Spotify’s LUFS sweet spot. Instead, focus on mixing to taste, and for your client’s satisfaction. With that said, referencing Youlean Loudness Meter can at least give you an idea of where you’re at in relation to standards set by different companies.
Youlean Loudness Meter Review: Free vs. Paid
Youlean has two versions: the free plugin, and the paid Pro plugin. The free one is pretty full-featured on its own, but we’ll compare the two editions to see which is best for you. Here are the specs from Youlean themselves:
FREE
- Film, TV, and Gaming presets
- LU, INT, TP, LRA, PLR, DR readouts
- Resizing, scaling GUI
- Mini view
- Custom true peak alert threshold
- True peak and loudness graph
- Loudness distribution graph
- Automatic loudness overdub
- Mono, Stereo, and 5.1 channel
- Low CPU consumption
- Never expires
PAID
- Everything in FREE, plus
- Streaming presets
- Dynamics graph
- PDF, PNG, or SVG export
- Saving custom presets
- Text scaling
- Dark and light theme support
- A/B save states
- Drag & drop analysis
- Lifetime FREE updates
- 30 days money back guarantee
Personally, I’d recommend the Pro version. And no, they’re not paying us to say that! A big reason why is that Pro includes streaming presets, which are very handy for us music mixers. That means you can load up a Spotify preset, and it will adjust the meter according to Spotify’s standards. The ideal level highlights yellow on the meter, and this number will change based on the chosen preset.
If you stick with the free Youlean Loudness Meter, you can still use it just fine, but you’ll have to research streaming standards on your own and memorize those numbers or write them down somewhere. Not the end of the world, but for a couple bucks you can just have a complete plugin.
Youlean Loudness Meter Tutorial


Using a loudness meter isn’t too difficult. That’s the good part! But if you’re still unsure on how to get started, here’s a quick step-by-step breakdown of how to use Youlean Loudness Meter.
1. Insert Youlean on the mix bus
The first step is simply loading the plugin. You’ll want to insert it on your mix bus/master, after any processing you’ve done on that track. That way Youlean receives the full song post mix bus processing, which might include effects like limiting.
Now you can load a preset based on the song’s destination. If it’s Spotify, select that. Apple Music, load that. You get the idea. Remember, streaming presets are only included in the Pro version. If you’re using the free plugin, you can skip the preset part.
2. Let your song play
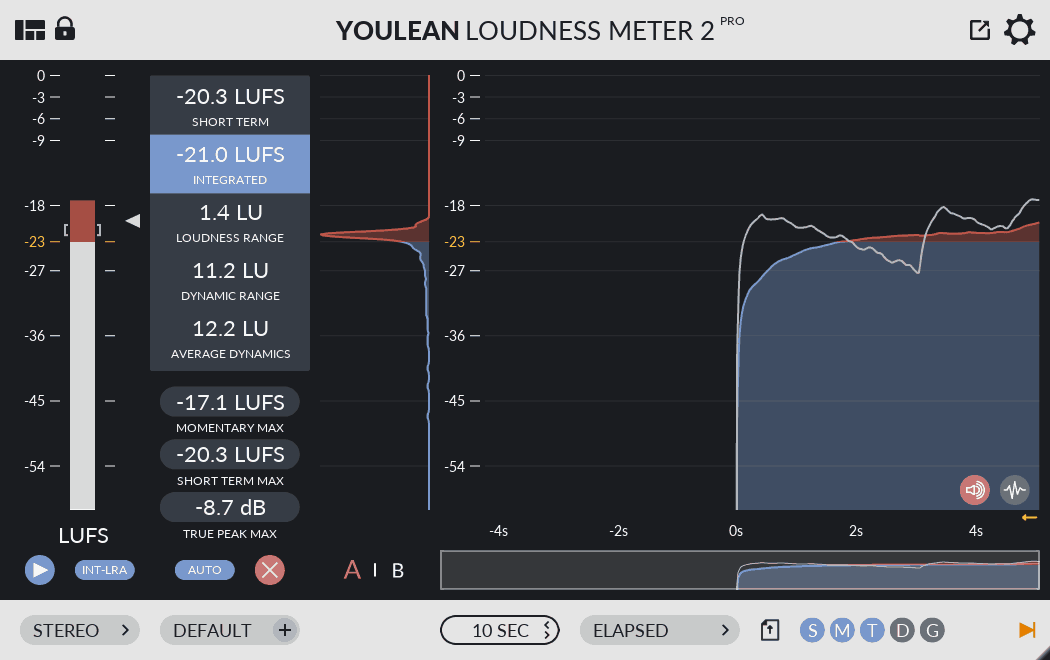
Now you can sit back and listen to your song with Youlean open. You’ll be able to monitor levels in real time via Short Term LUFS; your average overall level in LUFS via the Integrated reading; the Loudness Range, Dynamic Range, and Average Dynamics in LU; as well as the True Peak Max in dBFS.
You’ll also have a handy graph as a visual reference to see which parts of the song may be peaking like crazy, or which parts may be too quiet. This helps us adjust the dynamic range for a better sounding mix overall.
3. Make any necessary adjustments
So after you consult the numbers Youlean Loudness Meter provides, you can go back and adjust parts of the mix so that it better coincides with whatever standard you’re referencing. This part is going to vary from song to song. Let’s say your mix was just too loud; you can go back and adjust the settings on your limiter, for instance, if you were really driving it for added volume.
Adjusting the mix according to the loudness meter readings can be tedious, but don’t get discouraged. It’s important to remember that if you really, really like the way something sounds, just trust your instincts and taste. Don’t pull your hair out just because your mix might be “too loud for Spotify.”
The truth is, a great overall mix is going to sound great just about anywhere! And keep the consumer in mind as well. They’re not going to know that Spotify’s LUFS target is somewhere between -14 and -9, and oops, the chorus peaks at -7 and Spotify compressed it. Relax, listen, and trust yourself.
Want to learn more? Check out the Pro Mix Academy course Mastering Music with Warren Sokol!