
Keyboard shortcuts are non-negotiable if you want to master your DAW. The better you know your software, the faster you can implement creative ideas. Any time wasted trying to figure out how to do something is a hindrance to creativity and staying in the flow. These Ableton hotkeys will help you effortlessly perform essential tasks, so you can stay focused on the moment.
Ableton Hotkeys
These are some of the most useful keyboard shortcuts for editing, session navigation, and more. You’ll find a complete list of key commands in Ableton Live here!
Learning hotkeys is easily the best way to improve at Ableton (or any DAW for that matter). Expediting your workflow means you can focus on being creative as a producer, but it also lets you work at a high level engineering other artists. Everyone is different, of course, but many artists appreciate an engineer who is fast—plus, apart from actual sonics, it’s a good way to demonstrate that you know what you’re doing!
Please note that the ⌘ (command) modifier applies to Mac OS X. For Windows, substitute ⌘ for ⌃ (control).
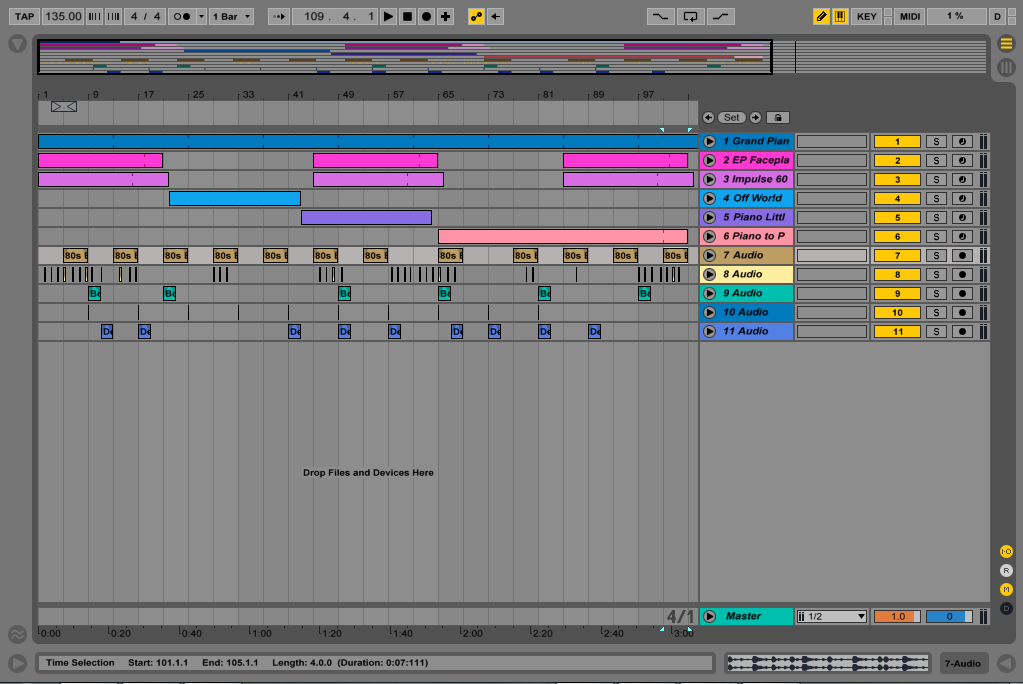
1. Toggle Arrangement / Session View
Tab. The tab key will let you switch between the arrangement view (where all your audio clips live) and the session view (a mixer window where you can see your tracks and plugins).
2. New Audio Track
⌘ + T. Adding a new audio track is one of the most basic and common functions in any DAW. Any external instruments, microphones, etc. will require an audio track to record. You’ll also be able to import audio files and have them occupy an audio track.
3. New MIDI Track
⌘ + ⇧ + T. Just as easily as you can create a new audio track, Ableton lets you throw a MIDI track into a session. Simply add the shift key into the command, and voila. MIDI tracks will let you play software instruments.
4. Insert MIDI Clip
⌘ + ⇧ + M. Once you have a new MIDI track, you can create a MIDI clip on it to start drawing in notes. Simply make a selection to determine its length, and use the Ableton hotkey to create a new clip.
5. Record
F9. Ableton’s is up there as one of the least intuitive key commands to begin recording. Still, you’ll need to use it often—at least it’s just one key.
6. Zoom to Selection
Z. Making a selection in the arrangement window and hitting Z will automatically zoom to it. For general zooming purposes, Ableton makes it incredibly simple: +to zoom in, and – to zoom out.
7. Split Clip at Selection
⌘ + E. This is one of the most common editing functions in any DAW. There are a ton of different reasons you’d want to chop a clip up into various parts.
8. Misc. Single-Button Hotkeys
A. Opens and closes automation lanes in the arrangement window.
B. Toggle draw mode for drawing inside MIDI Clips or writing automation.
R. Reverses the selected audio file in the arrangement view.
S. Collapses the height of all tracks in the arrangement view. A quick way to zoom out and review the session altogether.
0 (zero). Activates or deactivates any selected clip.
9. Select Loop
⌘ + L. Engages loop playback with a timeline selection made.
10. Quantize (MIDI editing)
⌘ + U. Just select the MIDI data you want to align and use the hotkey! You can also open quantization settings by throwing shift into the quantize command: ⌘ + ⇧ + U.
11. Move/Nudge Selected Clip
←/→ & ⇧ + ←/→. With a clip selected, you can move it using the left/right arrow keys, or nudge it to a specific value by holding the shift key and using the arrows.
12. Duplicate
⌘ + D. You can duplicate just about anything, including clips, audio tracks, and MIDI tracks. Just make a selection (let’s say it’s a kick drum sample) and use the hotkey. The entire selection will be duplicated, so adjust accordingly if needed.
13. Group Tracks
⌘ + G. Grouping is one of the easiest ways to apply the same processing to a bunch of tracks. Commonly grouped instruments are drums, guitars, keyboards, background vocals, etc. Any like instruments can benefit from being grouped together, plus it’s one way of keeping your session neat and organized.
14. Undo/Redo
⌘ + Z / ⌘ + ⇧ + Z. Perhaps remedial, but important nonetheless. Undo is likely to become one of the most used Ableton hotkeys in your arsenal (that isn’t a dig at your work!). On the flip side, Redo has your back when you change your mind.
15. Save (and do it often!)
⌘ + S. Along with Undo, the Save hotkey is practically universal across software and apps. If you don’t instinctively hit Save every 3 seconds, you haven’t been using your DAW long enough!
How to create custom hotkeys (Key Mapping)
⌘ + K activates MIDI/Key Mapping in Ableton. MIDI Mapping lets you use a MIDI controller to control various parameters; using your computer’s keyboard is called Key Mapping. Upon activating Key Mapping, everything that’s mappable will highlight orange.
Now you can simply click the parameter you want to assign a key to, and then hit the key you want to control it with.
On Mac OS X, you can also modify existing key commands through keyboard preferences. The path is as follows: System Preferences > Keyboard > Shortcuts > App Shortcuts
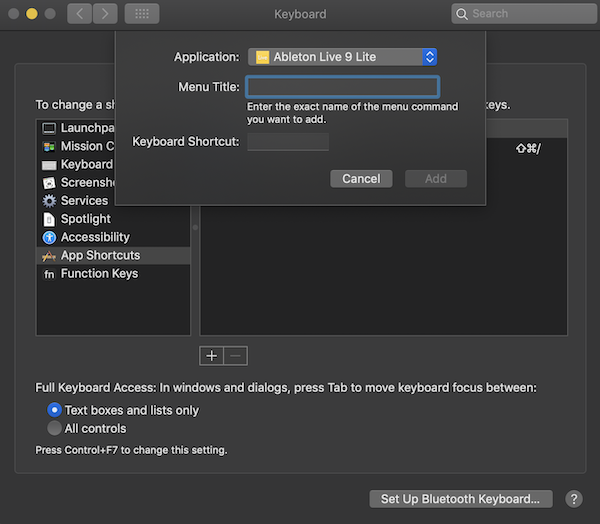

From here, click + and choose your version of Ableton. You’ll be able to customize any hotkey that appears under a dropdown menu in the actual DAW. This is important—the Menu Title must match the name found in the Ableton menu exactly.
So, it is possible to modify existing hotkeys as long as they’re manually selectable from a menu. Still, there’s nothing inside Ableton allowing you to re-map all of the DAW’s shortcuts, or even write macros for performing multiple tasks in one keystroke.