

Bass compression is easily one of the most important parts of a mix. Bass gives music that energy which is often felt more than heard. Low-end energy is critical because it has the power to produce a defined groove and an intelligible pocket.
It also has the ability to ruin a track by being weak and thin, or even worse, muddy and smeary. Being that it’s so important, bass compression is easy to get wrong, too. We’re typically a lot more heavy-handed with it than on other instruments, so it’s best to walk through the process step-by-step.
Solid bass compression technique is undoubtedly the difference between a rich, thick bass with awesome attack; or, one that’s the complete opposite of that! Unfortunately, low-end is pretty unforgiving in that there isn’t much in-between.
Using these tips as a guideline, you’ll be able to craft a stronger low-end mix that’ll give your music energy and life!
What’s the deal with bass compression?
The idea behind bass compression is to reduce the dynamic range of a performance. This is to keep low-end energy constant throughout the song. In contrast to compressing other instruments, we actually want very little dynamic range on bass.
Squashing a bass track with heavy compression creates consistency in the low-end that we want.
- Related: Mixing Bass Tutorial
We’re going to make the assumption that you already know how to use a compressor, and are simply looking to refine your low-end technique for better all-around mixes. Let’s get started!
How to Compress Bass

Typically you’ll want different amounts of gain reduction depending on the genre. EDM, rap/hip-hop, pop, metal, or any genre with insane amounts of low-end requires more compression. Other ‘lighter’ genres like jazz, folk, bluegrass, or acoustic singer-songwriter stuff doesn’t need as much containment.
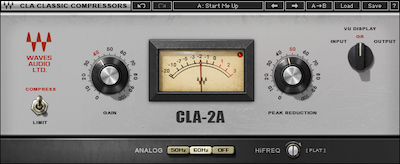
Finally, which compressor you decide to use it totally up to you. Lots of folks like using the tried-and-true 1176 or LA-2A in any of its various emulations. Your DAW’s stock compressor works great too! For what it’s worth, the LA-2A removes some of the guesswork with its basic control layout and can generate some great results.
First, set the ratio, attack, and release.
A ratio of 5:1 is fairly aggressive and will hit pretty hard in most instances. You’ll want your attack slowish at somewhere around 100 ms, and your release super fast at 1 ms.
Remember, we’re really trying to squash the bass, so heavier ratios are usually recommended. It isn’t uncommon to see mixers go up to 10:1 or more to crush that dynamic range to keep it solid and consistent.
Begin adjusting the threshold.

Start lowering the threshold until you see some pretty substantial gain reduction (around 5 dB or more). If your compressor plugin doesn’t have an auto-makeup gain feature, be sure to dial some of that lost level back in.
A/B the signal with and without the compressor and level match to the bypassed version. You don’t want a louder compressed signal tricking you into thinking it’s better!
See how the bass is sitting in the track. You might decide you need upwards of 10 dB of gain reduction, which is pretty common for bass compression. Increasing the ratio will help get you there faster without setting the threshold ridiculously low, which can start to sound unnatural.
Fine-tune the attack time.
With the right amount of gain reduction to keep the low-end full and energetic, you can start shaping the attack. On a bass guitar, this will be the instant the player’s fingers or pick hits the string.
In lots of cases, we want to preserve that attack but start compressing immediately afterwards. This is for punchy, aggressive bass compression. For a rounder tone, you can get away with fast attack times that smooth out the instrument’s transients. It’s up to you how you want it sound, but preserving the transient is a good starting point.
Right now we have 100 ms preserving the attack, but it’s a probably a little too slow. Bring the time down until you hear the attack get squashed or rounded down, then dial it back up a hair.
Fine-tune the release time.
Besides huge amounts of gain reduction, bass compression relies heavily on the right attack and release times. Actually, every instrument does!
In this case we have a fast release as our starting point, which lets the natural sustain of the instrument ring out. Slowing the release down will compress the decaying tail of the signal. Both very fast and very slow releases can sound strange, so normally we like to time it to the performance.
This usually means setting the release time so that gain reduction gradually returns to 0 just before the next note plays. Bass compression is as much about taste as it is knowing how to set your compressor, so let your judgment and ears lead the way!
- RELATED: Sub Bass: EQ & Mixing Tips
Bonus Tip: Sidechain Bass Compression
Kick and bass tend to compete for space in mixes. A common way to help them work together is by using sidechain compression.
Put a compressor on the bass track, then key its input using the kick drum. The kick drum now triggers the compressor instead of the bass. Every time the kick hits, the bass signal will ‘duck’ below it and out of the way.
Of course, you’ll need to adjust all the parameters like we’ve discussed to taste!