If your mixes feel flat and narrow, like everything is stuck between the speakers, then you should put some work into the stereo image! But don’t reach for a widening plugin just yet—there are simple ways to achieve better stereo imaging in your mix through production, selective panning, and more!
Creating Stereo Image for Beginners
Drums
One of the easiest and most obvious ways to create an interesting soundfield is through panning, and for most music it all starts with the drums.
Most mixers pan their drums one of two ways: from the drummer’s perspective, or from the audience’s perspective. Imagine you’re sitting behind a drum kit. Starting with the hi-hat, the various pieces of the kit move from left to right! It’s the opposite from the audience perspective.
If you pan from the drummer’s throne, start by pushing the hi-hat slightly left in the stereo image. Put the snare slightly more towards center from the hi-hat. As a bass instrument, keep the kick drum dead center.
Depending on how many toms there are, you’ll probably start slightly right at the top and go fairly far right at the floor tom. The overheads can be panned hard left and right for a really wide image, or just slightly inward from hard left and right.
With the drums panned, you can get a really cool stereo image effect, especially during fills across all the toms. Plus the width of the overheads makes the kit feel larger than it really is.
Rhythm Guitars
One of the most common rhythm guitar production techniques is double tracking. The name gives it away, but it’s recording the same part twice and panning one hard left and the other hard right. Straight away you’ll notice how massive the guitar sounds compared to a single take sitting in the center.

It’s important to note, too, that duplicating one take to a new track and panning those won’t create the same effect. Doubling the same take will make it louder, but it won’t change the width of the stereo image.
It’s actually the slight differences between multiple performances that create the width we hear!
Create Contrast
Another way to make a wide stereo image is to create contrast between the left and right speakers. This means that the tones can be ever so slightly different on each side of the mix.
Riffing off the double tracking example for rhythm guitars (pun intended), you can get even more width if you record each side using another tone! The same guitar and amp recorded twice and panned sounds massive, but what if you use a different guitar and/or amp for each side?
This creates a contrast between the left and right channels so the stereo image is even wider…
The overall stereo image can also change from section to section in the song for added contrast. For example, a hook with a bunch of background harmonies panned all over the place coming in can set itself apart from a narrower verse, and so on. Experiment with contrast in whichever way you see fit for your mix!
Vocals
A really cool trick for vocals is using a stereo delay. You can put an 1/8 note delay on one side and an 1/8 note triplet on the other. The result creates movement and depth around the vocal, making it sound bigger and wider than it really is, but it won’t push the vocalist back in the mix either.
Of course, panning background vocals around the stereofield is an easy way to add width too. If you have the luxury of working with a minimum of 4 backing harmonies, you can pan two hard left and right and two slightly more center. Width galore!
Use Mono Reverbs
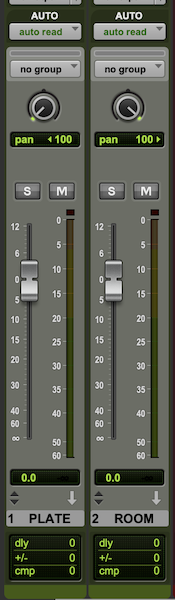

You read that correctly: using mono reverbs is a fantastic way to make your stereo image wider. Stereo reverbs/delays are more commonly used, and they do a fine job of making things sound wider. But, they lack a principle we talked about earlier, which is left/right contrast.
Mono reverbs take advantage of contrast on either side of the mix, and it works like this: create two mono aux inputs and load up your favorite reverb plugin on each. Pan them them hard left and right. Now, put a different reverb setting on each plugin. Try a plate on one side and maybe a large room on the other.
Send them to the desired track (it’s a great trick for vocals) and adjust the balance to taste. You’ll notice that it really adds a lot of width to the sides!