
A common question frequently heard is should studio monitors be vertical or horizontal? There’s good reason to wonder, and there’s a simple answer to that query which we’ll get into shortly. The underlying premise here is that optimal monitor placement plays such a huge role in establishing an accurate mixing space; and whether you place your speakers vertically or horizontally does factor into that. We’ll also cover several more general tips and best practices for monitor positioning so you can create the best mixing environment possible!
Should Studio Monitors Be Vertical or Horizontal?
In short, verify with your speakers’s paperwork. There are some monitors which can be placed in either orientation, while there are many more that should only be used vertically. The biggest issue you’d run into placing a vertical speaker horizontally is messing up the stereo image, since monitors are designed to propagate sound in a specific way. When in doubt, consult the manual, and if you do happen to have a horizontal speaker, make sure you place them with their tweeters on the outside so that they mirror each other.
Of course, any so-called “rules” in audio are meant to be broken. If you decide to go rogue and thwart the manufacturer’s recommendation, by all means, do it! You might find an orientation you prefer, even if it’s not what’s “right.”

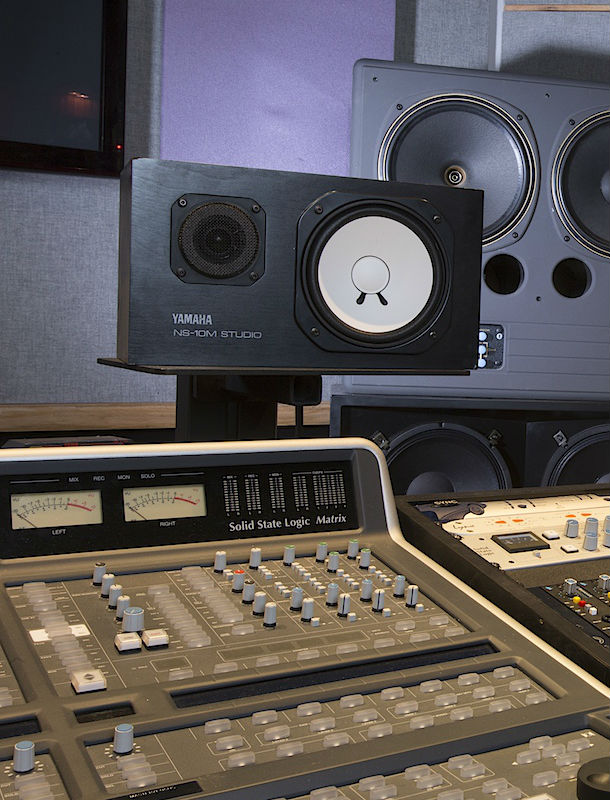
I’d also like to share a bit of history, and what I believe is at least a piece of why we ask ourselves, “Should studio monitors be vertical or horizontal?” It goes back to the infamous industry mainstay, Yamaha NS-10. No doubt we’re familiar with the speakers, and we’ve almost certainly seen them vertical and horizontal, leading us to believe that speaker orientation is a matter of taste. While that’s true to a certain extent, Yamaha initially had other intentions.
The original NS-10M was a hi-fi speaker for home stereo systems. It was designed to be vertical, as indicated by the position of the logo on the front of the speaker which was legible vertically. After almost a decade, and after studios began using NS-10s for professional monitoring, Yamaha released the NS-10M Studio. This speaker was made for horizontal orientation, again indicated by the logo which was now flipped 90 degrees. Years later you have studios using the hi-fi model horizontally, the studio model vertically, and everything in between!
5 Tips To Help You Nail Your Studio Monitor Placement
Once you’ve locked down orientation, here are some other guidelines for ideal monitor placement.
1. Avoid Long, Flat Walls and Corners
If you can, it’s better to place monitors on the short wall rather than the long wall of a rectangular room. Reflections bouncing off the back wall have to travel the length of the longer wall; by the time they reach your ears, they’re quieter than if they’d travel the shorter wall’s length. It’s also best to center your speakers on a wall versus placing them in a corner of the room.
Also, flat walls, or parallel surfaces, create reflections. It’s unrealistic in the home studio, but professionally designed studios often have no parallel surfaces!
- RELATED: The Best Portable PA System for Live Music [2022 Guide]
- RELATED: What Is Impedance in Audio? How to Avoid Empty Sounding Recordings
2. Symmetry Is Your Friend
A symmetrical room and symmetrical left/right speaker placement is your stereo image’s best friend. Asymmetrical placement can drastically alter the way you perceive the stereo image.
3. Triangulate Your Listening Position
To create the sweet spot, the speaker placement and listening position should form an equilateral triangle. It doesn’t have to be perfect, but do your best to at least eyeball your sweet spot for the best results.
4. Monitor Height
Ideally, the tweeter should be at about ear level. That’ll put you in the right place for the monitor’s sound dispersion.
5. Be Aware Of Reflective Surfaces (Including Your Desk/Console)
If you can run a mirror along nearby flat surfaces and see the speaker’s reflection in it, then you’re going to get acoustic reflections off of that surface. That most certainly includes the wall directly behind the speakers, the walls to their immediate sides, and above them on the ceiling; we call these first reflection points. If you’re going all in to create a viable mixing space at home, you should use acoustic treatment on the first reflection points. Be aware that your desk or console can be a hard, reflective surface too, and place your monitors on stands behind the desk/console if needed.
- RELATED: Best Home Studio Monitors for 2022