

Vocal EQ is one of the ways we get a recorded performance from “dry” to “radio-ready.” It has a huge influence on the overall quality of a vocal, and even just simple moves like filtering can change the sound completely.
Some of the most common basic moves include filtering the low-end, boosting high-end to add excitement and clarity, and attenuating any harsh or unpleasant frequencies. Once you start playing with vocal EQ, you’ll notice immediately how it can shape a vocal for the best sound possible!
Vocal EQ Areas of Interest
Knowing specific frequencies and how they effect vocals means you can make quick, precise adjustments with less guesswork. These are average ranges, with every artist and recording varying to some degree. Check out these areas of interest for vocal EQ:
- 100 to 300: body and muddiness
- 500 to 800 Hz: boxiness
- 800 to 1.5 kHz: nasal
- 3 to 6 kHz: presence
- 4 to 7 kHz: sibilance
- 10 to 15 kHz: air
You’ll find all of these important areas across the frequency spectrum in any given vocal, with some variation based on the vocalist him or herself, the microphone and other gear used, as well as the room.
Once you start to experiment with boosting/cutting these ranges, though, you’ll better understand how they effect a vocal’s overall tonality! Plus, you’ll be able to make informed decisions when you know where certain qualities live in a voice.
Let’s take a look at a step-by-step approach to equalizing vocals for any genre.
1. High-Pass Filter
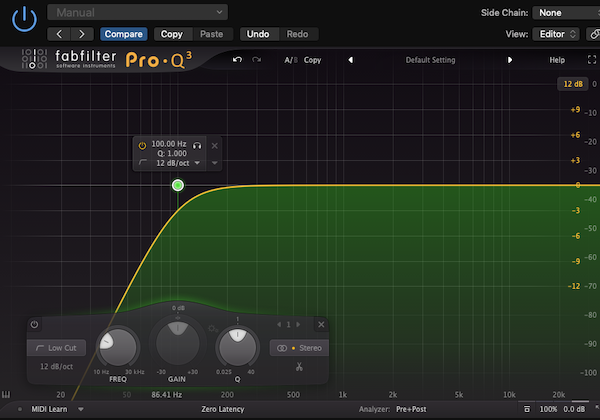
This is one of the first moves to make as you start EQ-ing your vocals. Load up your favorite EQ on your track and start with a filter around 100 Hz. The slope can be gentle so you’re not harshly cutting everything below 100—though there isn’t much useful information on vocals this low. You’ll be amazed at how much just a simple filter clears things up!

Many engineers will track vocals through a preamp with a HPF engaged. For reference, these typically range from 60-80 Hz. If you feel like your vocal needs more bottom end, try rolling off the filter to around 80 Hz. It depends on the voice and genre, but some mixers will even filter all the way up 120+ Hz!
Try seeing how high you can go on the filter without making the vocal unnaturally thin. That’s usually the sweet spot!
2. Set Up Universal EQ on a Vocal Bus
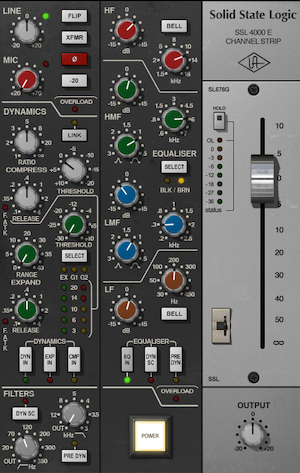

A lot of mixers have a go-to vocal signal chain on a bus, which they then route selected tracks to. A chain usually includes things like compression, de-essing, and EQ, which will be applied universally to every track routed to it.
Here’s where you can set up an EQ to process every vocal going through the bus. Something like a channel strip works very well to give a bit of color, as does your favorite Pultec emulation.
The bus EQ is where you’ll want to shape the overall sound of your vocals—namely high- and low-end. Pay careful attention to muddiness in the lows, anywhere between 100 and 300 Hz depending on the voice. Generally speaking, cutting around 250-300 will clear things up, as you’ve already filtered somewhere around 100 Hz. Don’t cut too much, though, as it can drain the life out of the performance.
You can also add air using the bus EQ. Between 10 and 12 kHz is a great place to brighten your vocal so it cuts through and sounds polished.
Let your bus EQ get the sound 70 or 80% of the way there. Then you can come in with tailored individual EQ later!
3. Individual EQ
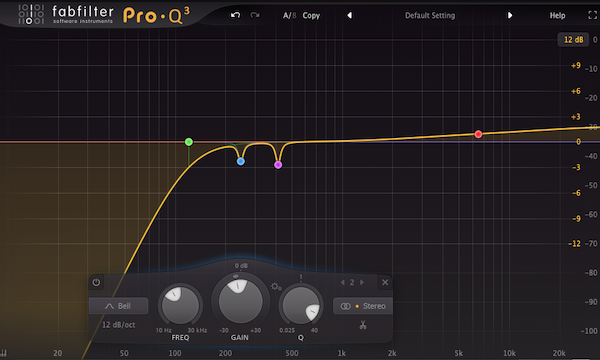

After filtering and doing some overall shaping on the vocal bus, you can go back to clean up the sound further. Specifically, this stage is where you can visit individual tracks to sweep for resonant frequencies and notch them out, etc.
You might even find that your bus EQ isn’t doing everything you want it to. Maybe the lows are still muddy, so cutting a bit more in that range is helpful. Maybe they need an extra bit of presence, which you can boost.
If a particular track is sounding overly harsh, for example, pay some attention to the 1 to 4 kHz range where a lot of rough-sounding frequencies live.
The idea in this stage is to finalize the overall vocal EQ!
For Further Consideration:
EQ Backgrounds Differently Than Leads
Separating background vocals/harmonies from the leads is super important, and you can do it with EQ! Usually backgrounds should sit below leads without overpowering or otherwise obscuring them. They should add some depth and richness without being distracting.
One way to tuck them under the lead vocal is to filter some of the high-end so it doesn’t clash. Try a low-pass filter around 7 or 8 kHz to carve off the top end, helping the backgrounds fit in without muddying up the leads!
Telephone EQ for Pop/Hip-Hop Ad Libs
One of the most common effects used on pop/hip-hop ad libs is the telephone EQ! This can be as simple as a band-pass to “pinch” the vocals by filtering the highs and lows. Sometimes you want something even more aggressive, so you might try boosting frequencies in the midrange along with band-passing to get a very crispy telephone effect.
A lot of EQs even have presets for achieving this effect. Try them out!
