Today, I will show you my 5 favourite plugins to increase my workflow, bring new life to my VST synths, increase my creative workflow and help me to achieve competitive mixes in any genre.
#1 Tal-Chorus-LX by TAL (Free)
The Tal-Chorus-LX is a replication of the famous chorus section from the 1980’s Juno Synth by Roland which you can still hear in radio hits from bands like Capital Cities, Tyler the Creator, Charlie Puth, Pharrell Williams and many more. While I love all my plugin versions of vintage synthesizers by brands like Arturia or Native Instruments as well as the original Brands Korg and Roland, I’m missing a bit of life in the sounds. It’s difficult to describe with words (The primary reason for having made this video, so you can hear it for yourself) but the chorus transforms your VST synth from a 2D image into a living 3D synthesizer and brings it sound wise closer to an Analog synth with just one click! It spreads the signal which creates an uneven doubling effect, wrestling in a fatter and wider sound. The plugin is very simple to handle, you can choose between Mode 1, Mode 2 or both at the same time. Every mode is simply a preset, which is very helpful to me, allowing me to easily make decisions whilst continuing without overthinking. Quincy Jones and Bruce Sweden call this moment “Paralysis by analysis” which is another crucial skill as a music producer to overcome.
Additionally, the plugin has a Volume function to increase and decrease the volume as well as a blend function which allows you to blend in the original signal with the processed one, which is very straightforward and helpful.
Get the Tal-Chorus-LX here and try it out in your next production!

#2 The God Particle by Cradle – A game changer
If you are a mixing engineer, you have definitely heard of Jaycen Joshua and most likely have dug into his mixing template to achieve loud, punchy and competitive mixes!
The God Particle is the only plugin that he uses in his masterbus to give the final touches for his songs and make them “radio ready”, so what is it exactly?
The God Particle is a plugin replica of Jaycen’s analog masterbus and has been created with the goal to replace Jaycen’s analog workflow – with success as you can see in Warren Huarts review of the plugin.
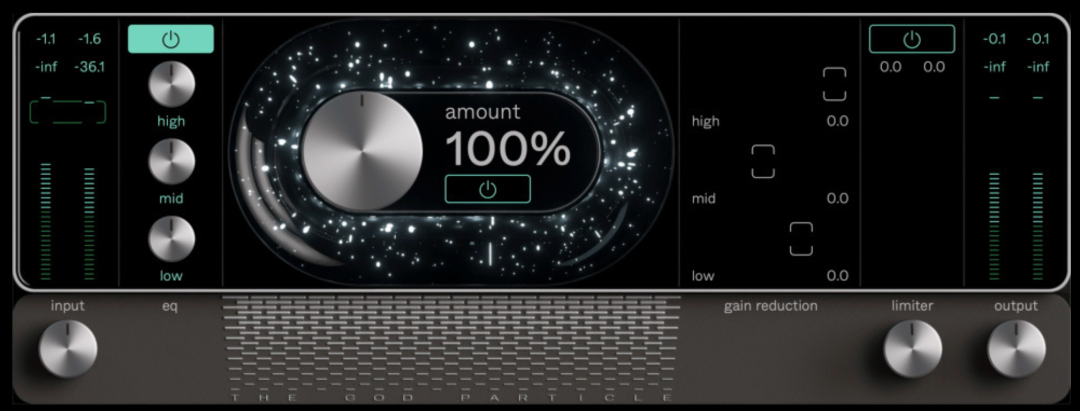
It contains 3 main sections and has markers to show you if you are in the correct range.
In the first stage, you can use the input gain to hit the right mark and once you’re in the middle of the green brackets, you hit the right loudness. The next section has an EQ band with the controls Highs, Mids and Lows, again showing with green brackets if you hit the right frequency balance. When the mid-section is for example too low, you can simply increase the mid-range and give it a little push. Here, I advise you to use your ears and listen to the results. If any of the bands are missing, try to fix it in the mix before pushing one of the 3 little helpers, your overall mix will sound better. The last section contains a limiter with the option to increase/decrease the limiting amount as well as the output gain. Personally, it’s very helpful that the plugin’s visuals don’t show too many details and have fewer options, so I can use my ears again and simply decide if I like the effect or not. As an extra feature, you have one final option to decide how much percent of the processing you want to apply to your mix, ranging from 0% (bypassed) to 200% which depends on your personal preference. I usually keep it on 100% and back it off a bit when the mix is already loud and strong. What’s quite remarkable here is how heavy the limiter works without any artifacts of distortion.
Mindset is important here as I saw for myself: For the first year of release, I ignored the plugin, as I saw it as another gizmo with a few knobs to make you sound good.
During my stay in Los Angeles, I realised that almost every engineer (with and without an analog masterchain) has the Gods Particle on it, which made my decision an easy one… to try it out for myself!
Now, I can’t live without it! It is especially helpful when I must mix several songs per day.
It’s truly amazing how well it works on other styles of music than just Hip Hop and Pop. It integrates fully into my daily world music productions and is pushing the songs exactly into the right direction.
Try out The God Particle by Cradle here for 2 weeks before purchasing and see how it can help you in your productions.
#3 SubLab XL by Future Audio Workshop for creative 808’s
World music fusions with Pop and Hip Hop are currently dominating our industry, therefore it’s good to stay creative and updated with the latest trends.
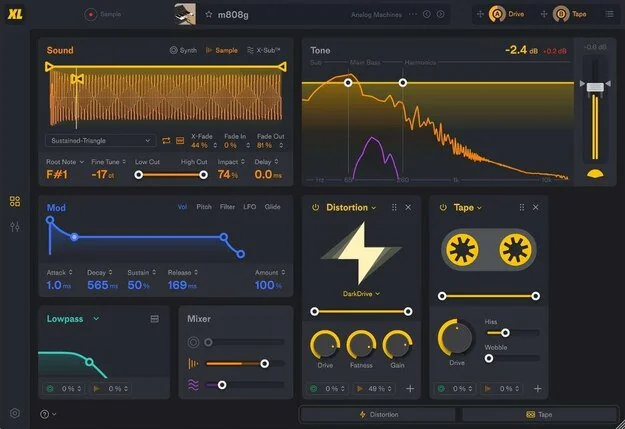
The SubLab XL is an absolute must for my workflow and already integrated in my Music Production Template when I start writing new songs. The Graphic User Interface is very smart and simple, allowing me to easily adapt between all the given options.
It allows me to mix 3 modules together to shape my 808s:
A Synth to generate and shape the waves I want (Sine, Saw, Square, Triangle and SuperSaw)
A sampling module to import my kicks and take only the parts I require.
A Sub generator which adds artificial harmonics to make it fat and juicy.
After I have chosen all of my preferences, I can move onto the next modules where I can further shape my sounds in the ADSR section (Attack, Delay, Sustain, Release), pitch and more.
In my filter, I can shape the EQ with a Low and High Cut EQ (with the flexibility to choose how much percentage of the EQ affects the individual element – either the Synth, Sample, Sub or all). Then I can blend all three elements together to further shape my 808 until I’m happy with it. Once this is done, we can either run the signal through the Distortion module which has many options, from Tape Saturation to Tubes. You can also add the saturation on a specifi
In the master section, I can decrease the volume and shape the EQ of my 808 to fit better into my song. This feature is always helpful in saving my own presets and sharing them with other producers. If you are running out of time with your production, you can simply click through many incredible presets, created by famous producers like Richie Souf, Swedish House Mafia and many more artists.
Get SubLab XL here by Future Audio Workshop and spice up your next productionsc frequency range of your 808.
While I praised simplicity with the Tal Chorus plugin on section 1, I would also like to share my excitement for unlimited possibilities with SubLab XL because I can create custom 808’s and be creative through the flexibility which helps to find and create my own sound.
#4 RVox by Waves for instant upfront vocals
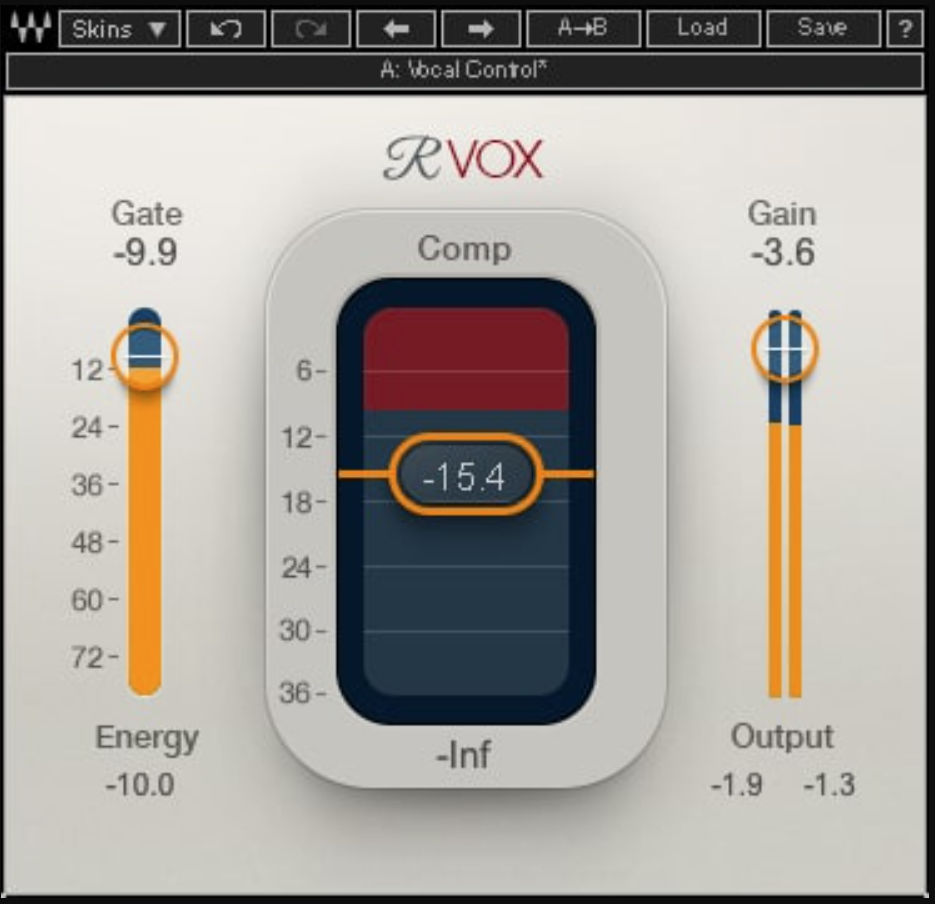
RVox is an incredible compressor containing only three knobs. In the past six years, I’ve never touched all three! RVox is a time saver and can be found in the vocal chain of many of the world’s best engineers. With the threshold button you can choose the amount of compression, which immediately brings your vocals forward, makes them sound warmer (a nice range of the vocal low end is getting boosted at the same time) and almost complete. This is the perfect time saver whilst recording vocals: Vocalists will provide a better performance when they hear themselves clearly. It also takes a lot of pressure off the artists when they can quickly hear how the vocals could sound in the final mix.
While adjusting the threshold and increasing the compression, the vocals have a built-in auto gain. With the gain slider you can adjust the final volume of your vocals – I often use automation on the gain slider instead of my volume fader in my DAW.
Try it out the RVox for yourself
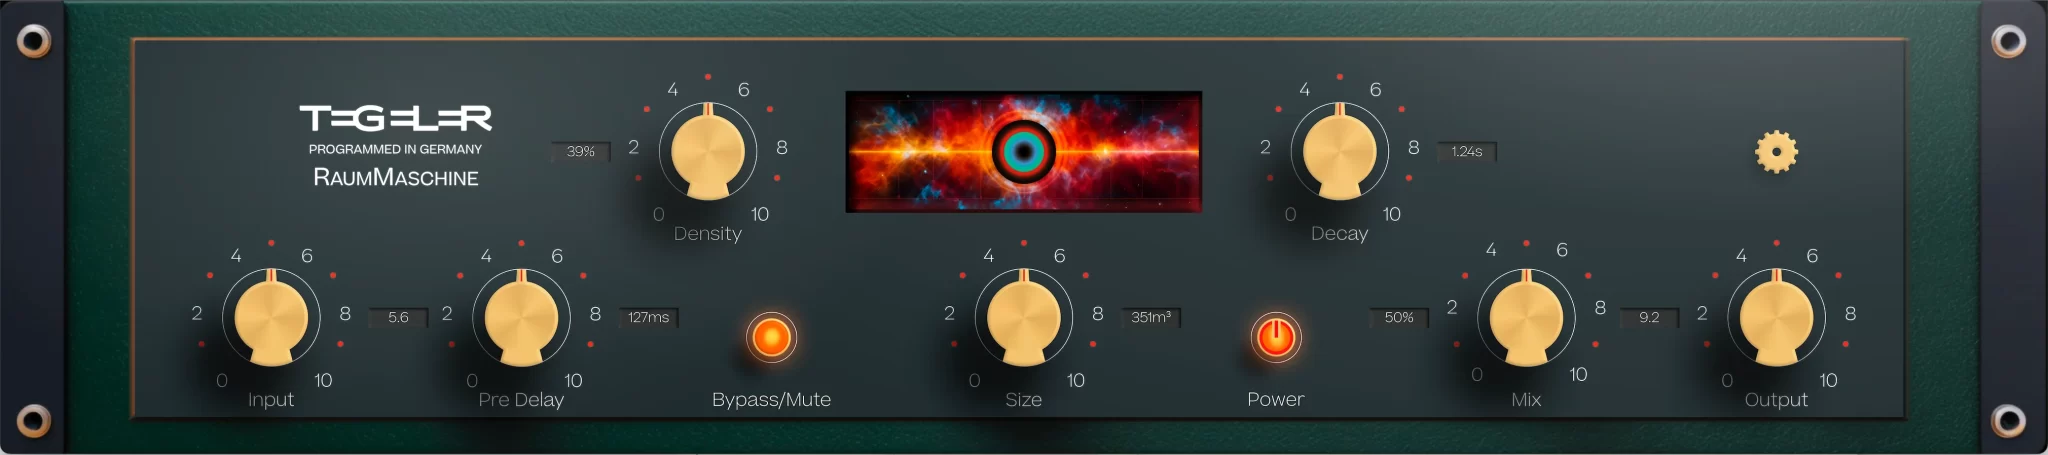
#5 Raummaschine (Plugin) by Tegeler Audio Manufaktur
While this reverb plugin is seriously insane, it helps me to create the dreamy soundscapes I’ve always been looking for. Once I had it, it found place in 35 productions with spacious big settings for backing vocal layers, spacy synths, roomy guitars, bigger vocals in the chorus section and more. It is a plugin version of their famous Raumzeitmaschine hardware unit and ranges from small, roomy vocals into journeys into space, saying “Hi to the Moon and coming back safely!” It found a place in my mixing template under the German name “TRaummaschine”, which translates into (English) “Dream Machine”.
In the first module, we can find the Input section to adjust your input gain. Then we have the pre delay settings which are crucial for vocal delays: Increase the pre delay time to make space for the original vocals and separate them from the processed reverb to maintain clarity in your mix. The density changes, how dense your reverb sounds, equal to the number of reflections in other plugins. The size increases the room size, so you can simply switch from “roomy” sounds to “cathedrals” and beyond our human stratosphere.
The decay option allows us to control how long the reverb will last. This is usually measured by the time from the original signal up to the end of the reverb tail. If you increase it, you have a longer reverb tail and can work on smooth transitions between chorus to the verse section. I am not sure how the Tegler Audio team did it, but it sounds very pleasant, very tasteful, and natural to my ears. For all the creative adventures it’s exactly what I need from a plugin, using it here for the song “Ichqa Umziry” on the gang vocals from the Band Tasuta N-Imal. In the tutorial, you can hear how big it sounds, creating a new landscape for the band.
I was informed by the Tegler team that they are not doing Black Friday sales, so no need to hesitate on purchasing it!
Thank you so much, I hope you discovered some new plugins for yourself in our video.
Please feel free to leave any of your questions, comments or concerns in the comments section below. I’m always happy to answer you and to help in any way that I can!
Don’t forget to like and subscribe to the Produce Like A Pro YouTube channel, thanks for watching and have fun creating!