

The famed Glyn Johns Method get its name from the man himself — an exceptional producer/engineer who’s worked with legendary artists like Led Zeppelin, The Rolling Stones, the Beatles (Get Back sessions), The Who, Eagles, Bob Dylan, Linda Ronstadt, the Band, Eric Clapton, the Clash, Ryan Adams, the Steve Miller Band, Small Faces, Blue Öyster Cult, Emmylou Harris, Humble Pie, and many, many others.
The Glyn Johns Method for drum miking created the massive sounds we’ve all heard by John Bonham on Zeppelin records. When we think of recording drums, we usually picture close miking each part of the kit, a pair of overheads, and as many room mics capturing some ambiance as we want. But with the Glyn Johns Method, you can achieve a big, punchy drum sound with just 4 mics!
All you need for this technique are 2 overheads, one kick mic, and one snare mic. The majority of the drum sound actually comes from the overheads, while the kick and snare close mics can beef up those two pieces of the kit. This is such a great, fairly simple technique if you don’t have a ton of mics at your disposal!
For overheads, you can use ribbon microphones if you’ve got them. The Beyerdynamic M160 works very nicely. If you don’t have ribbons, though, your favorite large-diaphragm condensers work great as well, and can typically be had much more affordably if you don’t have a pair already. For the kick mic you can go for either a dynamic or a condenser. Most of us don’t have a 47, so going for a standard dynamic like the AKG D112 or Shure 52 is no problem. For the snare, you can always count on the SM57 to do the job.
See also: Free Course & Multitracks: Recording Drums with Matt Starr
See also: Arturia MiniLab Mk2 Review
See also: Sonnox Inflator Review: Loudness without Compromise


The Glyn Johns Method starts with one mono overhead mic.
It starts by taking the first overhead and positioning it 40 to 60 inches directly above the snare (the middle of the kit). It should be pointing straight down at the kit capturing a complete, balanced image. You’ll want to hear a tasteful blend of snare, toms, and cymbals in this mic. Sometimes you’ll need to play with the angle — for example, if the cymbals are too harsh or if you need a bit more tom.
Next, position the second overhead.
This is where the Glyn Johns Method starts to really take shape. Your second overhead should be just to the right of the floor tom, approximately 6 inches above the rim. It’s facing straight across the the tom towards the snare and hi-hat — the capsule is perpendicular to the first mic. Even though we call it an “overhead,” it’s actually more of a side-fill mic capturing the kit from a fresh perspective.
The challenge with your two overheads now is getting them in phase. You’ll have to make sure that the capsule from the second overhead is exactly the same distance from the center of the snare as the first overhead. Hopefully you have a tape measure handy to get as accurate a measurement as possible.
If not, just take an XLR cable and have your drummer hold one end of it to the center of the snare as you stretch the cable up to the first overhead, pinching off the distance. With the drummer still holding his/her end to the snare, swing the cable over to the second overhead and make sure it’s lined up with where you’re pinching the cable.
Phase is super important to this technique, because you’ll lose a ton of depth and punch if the overheads aren’t placed carefully. Nobody wants a thin drum sound.
Once you’ve got the overheads right, the Glyn Johns Method is pretty straightforward!
Now it’s time to position the kick and snare spot mics.

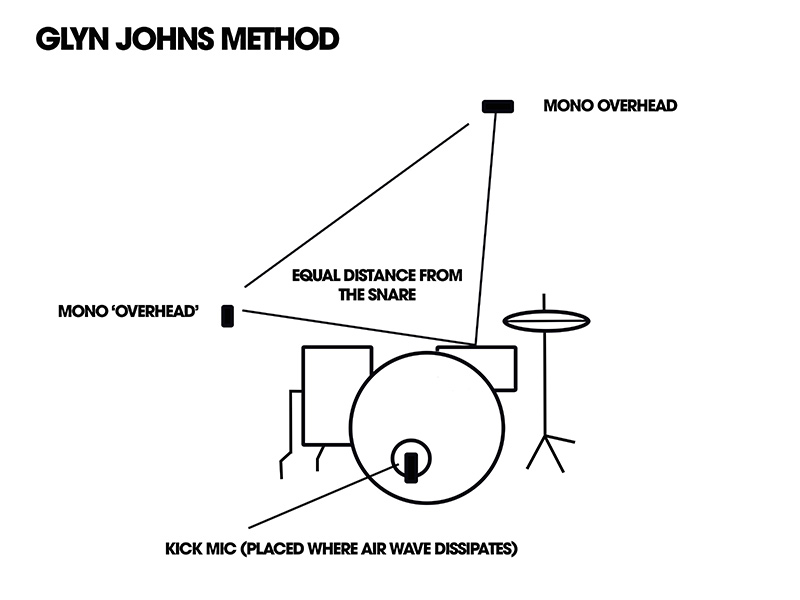
Take your preferred kick drum mic and place it in the port hole of your kick drum, or close to the skin. Get the desired “beefiness” by moving the mic closer or farther from the center of the drum. You can also muffle some of the boominess of the kick by adding a blanket or pillow.
Finish up by placing your last spot mic over the snare. Similar to the kick spot mic, this one is a matter of personal preference. Position your mic a couple inches above your snare, angled down. Point the snare towards the center, aimed at the drummer. Since you already have a full picture of sound with your overheads, play around with the snare and kick mics to achieve whatever kind of sound you are going for.
When it comes to the mix, keep your snare and kick in the center. Pan the first overhead mic far right, and the second overhead all the way left. If everything is set up properly, it should sound fairly well balanced, and is ready for your to make some creative tweaks.
Extra considerations for the Glyn Johns Method:
- Tuning plays a huge part in how your drums with end up sounding. What skins you use, how you tune them, and how new they are will play into how “bright” or “dark” they sound. Make sure these are dialed in to taste.
- The room is a huge part of the sound, too. Where you choose to record your drums will also make an impact on your overall sound. If you want to go full John Bonham, you’ll probably have to record a proper recording studio with a lot of open space. Otherwise with enough sound diffusers, almost any space can work.

Elevate Your Production Skills with Exclusive Resources
Step up your production game with the exclusive resources available at Produce Like A Pro Academy. From beginner to advanced levels, our courses are designed to equip you with the skills needed to excel in music production and audio engineering. Benefit from our expertly curated content and join a community that fosters growth and creativity.
Don’t miss out—join today and start making music that captivates!