
Small Room Acoustics and appropriate treatment:
It has been said that ‘You’ll never get a home studio room to the point where you can do professional mixes like they do in the big studios’.
This is false.
Today a great many commercial productions are done in small studios & home studios. You see production after production recorded and mixed ‘at the private home studio of the producer’.
The job of any Studio Designer is to create an acoustically accurate environment so that YOU, the artist, can work; faster & easier – Get the job done & enjoy it – Knock it out and do the next one – Make more money – Have an edge on your competition. This simple result is what my job in room acoustics and room treatment boils down to.
Amazing productions have been done in the past in horrible rooms because of the talent of the musicians, engineers, & producers – and they continue to this day. This may seem an odd thing to say coming from a design professional. But I follow the wise motto (modified for the music business): “If it’s not Baroque, Don’t FIX it!”
That said, I’ll move on to my recommendations for Treating your Space.
Room size and Ratios:
If you cannot build or move a wall, room mode calculators will only tell you what you’ve got. Don’t try to see if you have a good ratio. It is irrelevant.
It is, however, important that you have good modal distribution, especially if you don’t use enough bass trapping. (When I say enough, I mean A LOT!)
Cubes are bad, as are room dimensions with common denominators. (When designing a studio from ground up I will use prime numbers for the room dimensions where possible.) For example; if you have a room that is 5 by 10 by 8, you have common denominators of 2 and 5, so 10 would need to change to 11. This works in feet or meters. It is simple mathematics. Of course, you should run it through a room mode calculator like the one on my resources page to be sure. Again, this is only IF you can do anything about the dimensions. Most people can’t, and if that’s you, it’s not the end of the world.
The point of checking your room ratio or dimensions with a mode calculator is; it can tell you where you might have problem areas – plus information like: the lowest axial mode (if your room is concrete), the Schroeder frequency of the room, the ideal RT-60 (target), listening position, etc.
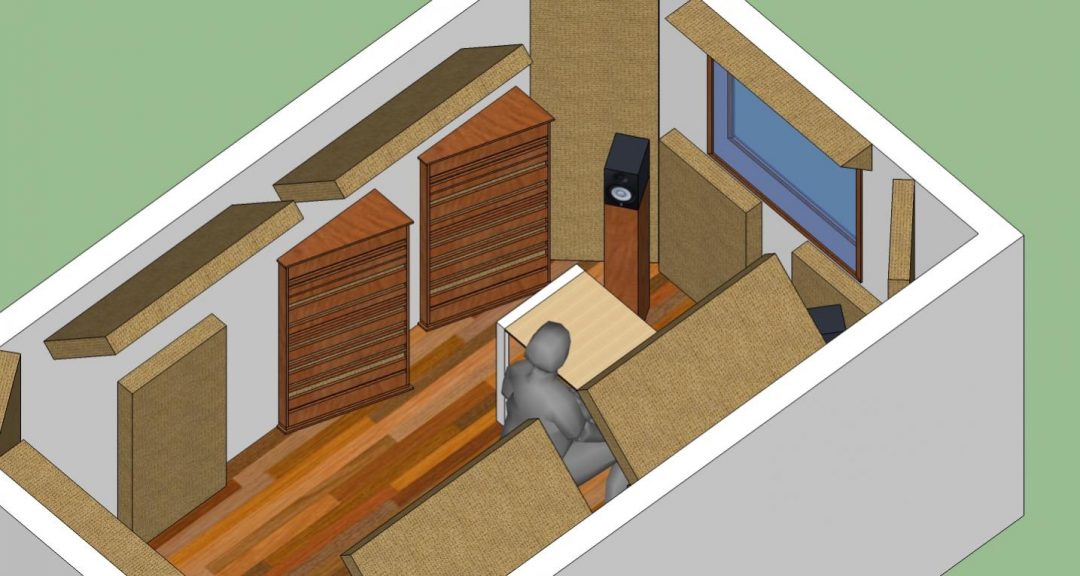
Treatment & Trapping:
I will always design for ‘optimal’ although, you can always do less. It is important that one knows and accepts the limitations that the real world imposes.
For best results, I recommend a bare minimum treatment of 20% of 5 surfaces. The floor is excluded and since I am mentioning floors; All studio rooms should have hard floors, EXCEPT for Foley rooms which use thick padded carpet.
Ok, so this means that 20% of four walls and the ceiling will be covered with treatment. Of primary importance are first reflection points (side walls and ceiling) and the back wall. The treatment of the back wall, or lack thereof, will greatly affect the perceived peaks and dips in the frequency response at the mix position, as will:
Speaker position:
The speakers that you use, be they M-Audio or ATCs, will always be the ‘Elephant’ in the room. In other words, compared to the technological advances of electronics and data storage these ‘things’ are ancient relics that color, distort, and literally screw-up the recorded sounds as they try to ‘reproduce’ them in your room. The physics of this energy transfer is complex, so I’m not going to bore you. We are stuck with these ‘things’ for the time being but I wanted you all to know that there are no perfect speakers. More expensive units are usually much better, but get what you can afford and work with it. With the exception of my speakers which I have designed for flush mounting in our studios and they are perfect!! – Just kidding! But they are very, very good and on par or better than the competition. (of COURSE, I’m gonna say that!)
SBIR or Speaker Boundary Interference Response is usually the cause of most monitoring anomalies. – I continue to see folks quoting online references that tell them to keep the speakers at least ‘so far’ away from the walls. Audiophiles are told to put speakers about 8 feet away from the front wall, etc. This is simply FALSE. I will explain:
First, let me say that if you get the Low Frequency response in your room ‘right’, you have won 95% of the battle. Low frequency begins folding around objects at the top of the transition region and truly becomes omni-directional at the Schroeder frequency of the room. (Study the information just below the Bonello Distribution graph on the AllModes tab of my room mode calculator)
So, the low frequencies produced by the speakers will fold around the cabinet and expand in a sphere in all directions until they hit an obstruction and reflect back. It is this REFLECTION that causes the problems.
When the speaker is further from the room boundary the reflection will be delayed for a longer period of time. Sound travels at 343.54 m/sec @ 20° C or 1129.42 ft/sec. @ 70° F. If your speaker baffle (face) is 1.22 meters or 4 feet from a boundary the delay will be 7.1 milliseconds. This is half the length of a sound wave at 70 Hz, therefore full trapping is required at this frequency to eliminate the destructive reflection. NOW, push the speaker closer to the boundary so that it is half that distance or 61 cm / 2 feet. The resulting reflection will cause a delay (compared to the source) of 3.5 mS, corresponding to the half-wavelength of 141 Hz.
Now that is quite a bit easier to trap. I’ll explain with an example; At zero degrees incidence, a 1/4 wavelength trap is required to be as deep as the speaker is far from the boundary. 61 cm distance = 61 cm deep trap. 122 cm distance (4 feet) = the SAME distance filled with an absorptive trap. — This is simply TOO MUCH to put in most home studios!
Solution: Put the speakers/monitors as close to the front wall (boundary) as physically possible. This will result in a much higher interference frequency and therefore a much easier treatment solution.
Treatment options & fabrics:
When you build treatment panels, the density or GFR (Gas Flow Resistivity) should follow the thickness of the panels. For example, use higher density/GFR product for thin panels. As the panels go thicker, use lighter/lower GFR product. Rockwool & Fiberglass are made with the same process but with slightly different materials. Rockwool is made from Basalt and Fiberglass from Silica Sand. Rockwool tends to be crumbly while Fiberglass can be made more rigid and still have a low GFR. BOTH are equally suitable but not perfectly interchangeable. However, it is my opinion that there is too much ‘splitting of hairs’ over these minute differences. Bottom line: Get what is available to you in your area of the world and make it work. I have never recommended higher density than 60kg/m3 or 4lbs/ft3. (m3 = cubic meters and ft3 = cubic feet)
Any trap deeper than 4” should be composed of mostly lightweight regular building insulation. The cheap stuff!
The fabric that you choose should be breathable. In other words, you should be able to put it across your face and still be able to breathe comfortably. If not, the gas flow resistivity is too high and it will be acoustically reflective especially at glancing angles.
If you are concerned with fibers escaping, you can use a 1/2″ (12 mm) layer of Dacron. Dacron is used in dress making and furniture, pillows, etc.
Foam acoustic treatment:
Everything has a place. I have often used foam wedges on top of regular treatment panels that are placed at reflection points in critical listening environments since the fabric used can be (will be) somewhat reflective. If the treatment is very close to the operator, this could be a serious problem. Therefore highly absorbent foam can be used on top of the treatment panels to take care of the upper midrange frequencies that would otherwise be reflected into the sweet spot. Or simply use a very low GFR fabric like burlap or similar.
Take care in using ONLY foam treatment in your room. It IS helpful, very useful, and has a place – especially in HOME studios, but it is NOT the Full solution to your room treatment needs. You will need much more trapping than can be obtained with a foam treatment plan. Now, I am not saying that you can’t do it with foam. I am saying that proper treatment done with foam can cost at least 5 times the price of treatment that you can build with a little plywood, rock wool, glasswool, and fabric. These days, every penny counts and it will certainly add up when you build your home studio. For more information subscribe to my youtube channel.
Vocal booths and recording:
It is important to eliminate destructive reflections into the microphone when recording, however panels placed behind a cardioid pattern microphone will do little for room reflections. If the recording is important, the room should be treated so that the frequency response at the mic is uniform and uncolored as it is very difficult to remove the room coloration without affecting the original sound of the voice or instrument. Although today’s software IS very good and filters can do the job, that’s not the way a good record is made.
Panels around the vocalist will improve the recording in a treated room. They can help in an otherwise untreated room, but small panels that are mounted on the mic stand are, in my opinion, far too small to have much of an effect – especially in an untreated room.
For absorption panels to work properly in an otherwise untreated room, you will need to place them AROUND the vocalist & microphone so that they;
1. Absorb the initial sound waves from the vocalist and reduce the sound available to reflect off of surfaces in the room.
2. Absorb any reflections that ‘get through’ and keep them from entering the microphone at interference levels (higher than -30 dB relative to the source sound).
Panels will do next to nothing for frequencies below 250 Hz. The frequency range of 80 – 300 Hz is the most problematic for voice / vocal recording… That’s why trapping is so very important for a vocal booth.
Mixing position:
#1 . IF your mix room, control room, or critical listening room is very large, {over 30 square meters or 323 square feet}, you have the option of facing either the short or long wall. HOWEVER, the option of facing the long wall usually corresponds to having a DOOR in the long wall leading into the tracking area or other ‘Limitations’. It is not desirable from a design perspective, nor is it optimal!
#2 . If your room is small, i.e.; less than very large (see above), you must ALWAYS face the short wall.
NOT facing the short wall usually will place the listener in the CENTER of the room, which is a very bad place to try to get accuracy in the low frequencies. Also, facing the long wall situates the ears too close to any diffusing surfaces in the back wall, assuming that you are trying to make an LEDE or RFZ style room.
Therefore; Small rooms shall always be oriented so that the listener faces the short wall.
Listening position: Start by seating yourself so that your ears are lined up with a line, parallel to the front wall, that is exactly 3/8 the length of the room. This dimension is obtained by multiplying the length of the room (in inches or millimeters) times 0.375. Take the result of the equation and measure back from the front wall. – Not the treatment.
All the best!
Cheers,
John
https://www.producelikeapro.com/video/john-brandt-interview/