Learning to mix an up-front, exciting vocal doesn’t happen overnight. Arguably the most important aspect of a song, a great sounding, competitive vocal has the power to stand out from the pack. But how do we even get there? Knowing how to effectively compress vocals is a step in the right direction.
Understanding compression on paper is one thing–it controls the dynamics of a performance by making the loud parts quieter and the quiet parts louder. But for many of us who are new to mixing, discerning it’s effect on an element can be difficult until we’ve used too much!
There isn’t a “one size fits all” approach to compress vocals, but there are starting points and techniques that can be applied anywhere and tweaked to suit the individual mix. We’ll delve into some of these below!
Compress Vocals Using a Starting Point
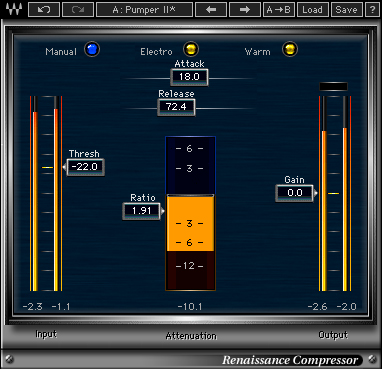
Working with a single compressor, you’ll want to understand some basic settings to begin with. The idea isn’t to crush the lead vocal, but to experiment with gain reduction to achieve the desired dynamic control.
According to Bobby Owsinski, a renowned engineer, author, and educator, a 4:1 ratio, medium/fast attack, and medium release is a great place to start. You’ll then want to adjust the threshold for about 3 to 5 dB of gain reduction and see where things sit. From there, you can adjust to taste, confident that you’ve begun with a solid foundation.
You’ll also want to decide whether you need a fast, aggressive compressor or something lighter and more transparent. It’s probably a good idea to familiarize yourself with your options, whether you’re starting off with stock plugins or using third-party ones.
For further consideration is where to place the compressor in the signal chain, namely pre- or post-EQ. There are many differing opinions and ultimately it all boils down to whichever sounds best to certain ears or in particular situations.
The main takeaway is this: a pre-EQ compressor, first in the signal chain, operates on the unprocessed vocal. Changes made to EQ won’t effect the compressor’s settings. The opposite is true for post-EQ compression, where equalization will alter the way your vocal hits the compressor.
Experiment with the given starting point and both pre- or post-EQ compression to see what sounds good to you!
Top Vocal Compressors
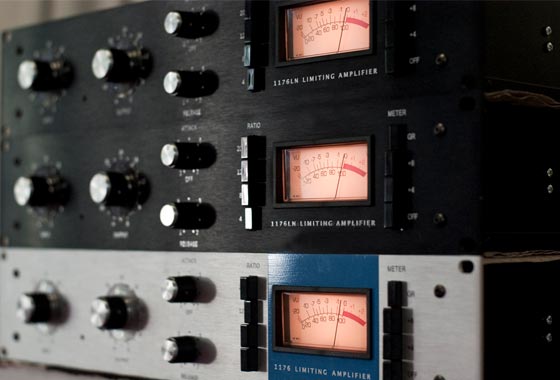
- Universal Audio 1176: One of the most famous and widely used limiting amplifiers of all time. It’s tremendous on vocals, whether you’re using the real thing or one of many plugin emulations. The Waves CLA-76 version is particularly great, as is the UAD one. When it’s time to compress vocals, arm yourself with an 1176.
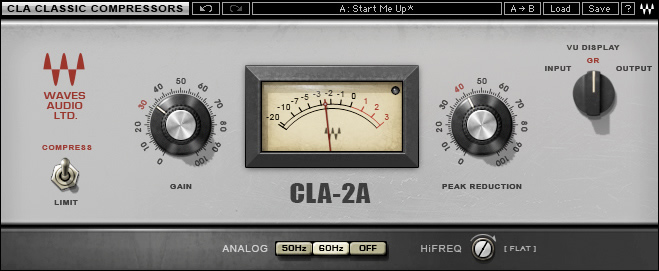
- Teletronix LA-2A: For a cool tube-y sound, you can’t go wrong with an LA-2A. I keep both an 1176 and a 2A (plugins) on my vocal buss, with the latter applying just a bit of glue and tube character at the end of the chain.
- Empirical Labs Distressor: Another fantastic compressor. One unique feature is the ability to add 2nd- or 3rd-order harmonics to the signal, emulating vintage tape saturation. It also has a wide range of ratio settings for more control.
- dbx 160A: Again, one of the most-used compressors ever. It may not look like much, sporting just threshold, ratio, and output controls, but it’s highly regarded and has been used on everything.
 Compress in Stages
 Compress in Stages
Simply put, don’t be afraid to compress vocals with more than one processor. For beginners who are likely hyperaware of overusing compression, this may seem counterintuitive, but the idea is this:
Instead of getting 10+ dB of gain reduction from one processor, use multiple compressors with 2 to 3 dB of gain reduction each. You’ll probably find that the desired dynamic control is there without unnatural or very audible compression. This technique is called serial compression.
This is very common on bass, which tends to require quite a bit of compression, though it can be applied to vocals as well!
Parallel Compression
Parallel compression is a go-to technique to push a vocal track forward and make it sound bigger or more aggressive. It’s been used since the ’70s to achieve more punch in a natural sounding way. It often sounds more complicated than it really is, so don’t be afraid to try it out!
In your DAW, make a copy of your lead vocal track and place a compressor on it. You’ll want to hit the vocal hard, so exaggerate your compressor’s settings even to the point in which it doesn’t sound pleasant.
Make sure the original vocal track is at the desired level, and bring up the compressed copy’s fader until it sits just beneath the original. Parallel compression gives the impression of control without sounding completely squashed. It’s a fantastic way to compress vocals, but works with almost any individual instrument, too!
Tonal vs. Dynamic Vocal Compression
How you choose to set your compressor(s) will depend on what you hope to achieve with it. Does the song warrant a modern, in-your-face vocal, or something a bit more subtle and reserved? Is the performance fairly consistent, or does it need a ton of dynamic help? Was the vocalist energetic and aggressive, or listless and dull?
SEE ALSO: HOW TO USE A COMPRESSOR
SEE ALSO: Arturia Pigments 3 Review
SEE ALSO: Best EQ Plugins in 2021
SEE ALSO: How to Add Drum Kits to FL Studio
The answers to these questions will help you decide whether you’re after tonal compression, dynamic compression, or a mixture of both.
Tonal Compression
This is the lightest use of compression which will smooth out your vocals and give them just a bit of dynamic control. You don’t want to crush the transients because that will push the vocals further back in the mix. Instead, you’ll want to add some musical tone to the performance.
A slow attack and release with just 2 to 3 dB of gain reduction does the trick if tonal compression is what you’re after.
Dynamic Compression
Dynamic compression is typically used to catch the sharpest peaks in the source material and reel them in.
You’ll want a faster attack and release time and a higher threshold and ratio. Whereas the idea of tonal compression is to catch every word and smooth things out, you don’t want to compress everything here–just the peaks!
Generally speaking, using a combination of both tonal and dynamic vocal compression is the key to a better sounding vocal!