The Lindell Audio 902 de-esser plugin digitizes one of the most popular “intelligent” de-essers of the ’80s — the dbx 902. The original hardware is renowned for its ease of use, employing just two parameters. In this Lindell Audio 902 de-esser review, we’ll have a look at the analog emulation and the contemporary features that make it even better for in-the-box de-essing.
How to Use a De-Esser
The first step in understanding de-essing is knowing your options. These include clip gain, de-esser plugins like the Lindell 902, as well as dynamic EQs such as the FabFilter Pro-Q 3. Many engineers agree that the most natural way to attenuate vocal sibilance is by first going through takes and manually clip gaining harsh “esses” down. It’s tedious, but it’s a good first line of defense and ensures the de-esser isn’t working overtime.
Here are some general guidelines for using a de-esser plugin:
- De-ess in stages. Like compression, hitting one de-esser too hard can result in unnatural sounds.
- Set the threshold so that it only kicks in on sibilance. If it’s working constantly, the threshold is too low.
- Automate your settings. Vocals are dynamic, meaning they’re rarely consistent throughout. Different parts of the performance may necessitate different de-esser settings.
Where to Put a De-Esser in the Chain
Engineers will typically place de-essers in the chain on a case by case basis. You could argue that early, or later, in the chain is the best.
Thinking logically for a moment, it makes sense to de-ess after EQ. The main reason being, let’s say you boosted high frequencies to get some presence or air out of a vocal. De-essing after lets you tame the harshness that comes with that, so you still have a present, clear vocal but it’s smoothed out by the de-esser.
Experiment with placement to determine the preferred solution given the performance.
Lindell De-Esser Settings for Vocals
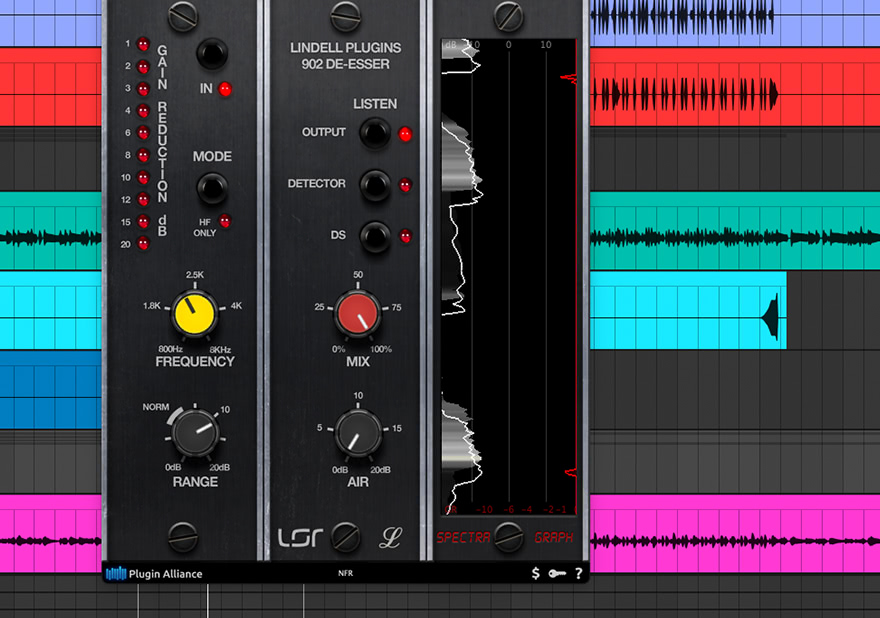
We mentioned this very important parameter earlier: Threshold. Now here’s the thing — the Lindell Audio 902 de-esser doesn’t have a threshold knob! It automatically adapts to the signal for smooth, controlled de-essing throughout the vocal.
The Lindell 902 workflow is as easy as it gets. All you have to do is select the target frequency and the amount of gain reduction to apply. New digital features not found on the dbx 902 are a Mix control for parallel processing and an Air control to add back some high frequencies rounded off by de-essing.
Here’s a good place to begin. Start somewhere with the target frequency between 4 and 8 kHz. Adjust the Range for 3-5 dB of gain reduction. Keep the Mix at 100% and tweak settings until the de-essing sounds natural. Adjust the Air knob to taste if any high frequency content has been lost.
Conclusion: Is the Lindell Audio 902 De-Esser Worth It?
The Lindell Audio 902 de-esser is definitely worth it if you haven’t settled on a favorite plugin yet. Simply put, we love a good analog emulation, and we love a classic piece of hardware that not only sounds great, but is easy to use. The original dbx 902 ticked those boxes, and the Lindell faithfully recreates that experience.
If you’re happy with your current de-essing, it might not be worth fixing something that isn’t broken. In any case, the Lindell Audio 902 is a great solution to vocal de-essing with some old school simplicity.