Sibilance is what we call the hissing noise made by ‘ess’ and ‘shh’ sounds in the voice. We don’t notice it in conversation, but it can get really harsh on a recorded vocal. A de-esser can take care of excess sibilance and make our vocals sound smoother and more pleasant.
What is a de-esser and what does it do?
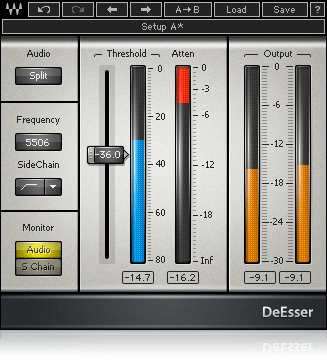
The most common tool for taming sibilance is a de-esser plugin. De-essers operate specifically on mid and high frequencies where sibilance lives. Many of them have pretty simple controls, where you select a center frequency and set the threshold to taste. Whenever the chosen frequency, or narrow range of frequencies, goes over the threshold, the de-esser applies gain reduction to those frequencies only. You can achieve the same thing with a dynamic EQ like FabFilter’s Pro-Q 3, or even a multiband compressor.
Back in the day before plugins, engineers would run a compressor with a high-pass filter inserted in the sidechain. They’d filter out everything below the sibilance so that the compressor only kicks in when ‘essy’ frequencies go above the threshold. Clever!
Is it necessary?
Some form of de-essing is necessary in most cases. Everybody has natural sibilance in their voice—some just have more or less than others. Whenever ‘esses’ get harsh or become very noticeable, you’ll want to apply some form of de-essing.
De-essing primarily refers to techniques done in-the-box after the fact. But, you can think about controlling sibilance on the way in as well. For example, you may want to use a darker microphone on someone who has a lot of natural sibilance or presence in their voice—just to make life easier later on!
Is a de-esser a compressor?
In short, yes! It’s a frequency-specific compressor. It doesn’t respond to the whole signal—just a chosen frequency or range. Gain reduction only kicks in when sibilant frequencies exceed the threshold.
How to De-Ess Vocals
The easiest way to de-ess vocals is with a plugin. That’ll get you about 80 or 90% there, and we’ll discuss other de-essing techniques and tricks later. For now, let’s talk about how to use a plugin in the simplest terms.
De-esser settings for vocals
Unfortunately there isn’t a one-size-fits-all approach to de-essing. If you think about, sibilance really comes down to the individual voice, the performance, and even the lyrics! The problem with trying to pinpoint specific de-esser settings is that sibilance occupies a large range of frequencies and varies from vocalist to vocalist. Luckily, though, de-esser plugins are simple. Here’s a general guide to setting a de-esser:
- Loop a section of your vocal with a lot of essy sounds and load up your favorite de-esser plugin.
- Find the right center frequency where sibilance is the worst. In many instances, a male vocalist will center around 5 or 6 kHz, and a female around 7 or 8 kHz. Most de-esser plugins will let you monitor just the selected frequency, so you can sweep around to where esses are harshest.
- Adjust the threshold. The key here is getting just enough attenuation to round out the sibilance without making the vocal sound dull or dark.
More De-Esser Tips for Pro Vocals
Here are some more tips, tricks, and philosophies on de-essing vocals!
A de-esser isn’t just for sibilance.
Remember, all it’s doing is compressing a specific frequency when it gets too loud. It’s up to us to decide which frequency that is.
Most de-essing plugins let you set frequencies within a certain range—usually something like 2 to 10 kHz. The most offensive sibilance is typically between 4 and 7 kHz—but what’s happening lower than that?
One of my favorite tricks is to set up a de-esser on my vocal bus with the frequency set around 2 kHz. This isn’t necessarily acting on the sibilant syllables specifically, but rather on the harsh and unpleasant sounds in the 2 kHz range!
Control overall vocal brightness with a de-essing plugin.
If you’re going for an in-your-face, exciting sounding vocal, you need that extra air in the highs. The problem is that there’s a fine line between a pleasant bit of brightness and harshness. A de-esser works brilliantly to keep things controlled and musical.
What you can do is boost the top end with an EQ (think anywhere between 6 and 12 kHz) and tame it with a de-esser. You’ll get the brightness and clarity from boosting with the EQ, minus the exaggerated “s” and “t” sounds thanks to the de-esser.
Don’t rely on a plugin for the most natural results.
While it’s quick and convenient to slap a de-esser on our vocals and call it a day, sometimes they need a little more care to be their absolute best. This requires a bit of manual labor.
Manual de-essing means grabbing all the sibilant parts of a vocal and clip-gaining them down. If this sounds ridiculous and annoying, it is, but it’s totally worth the hassle. When you take the time to go over edits like this, the result can sound much more natural than ‘automatic’ de-essers.
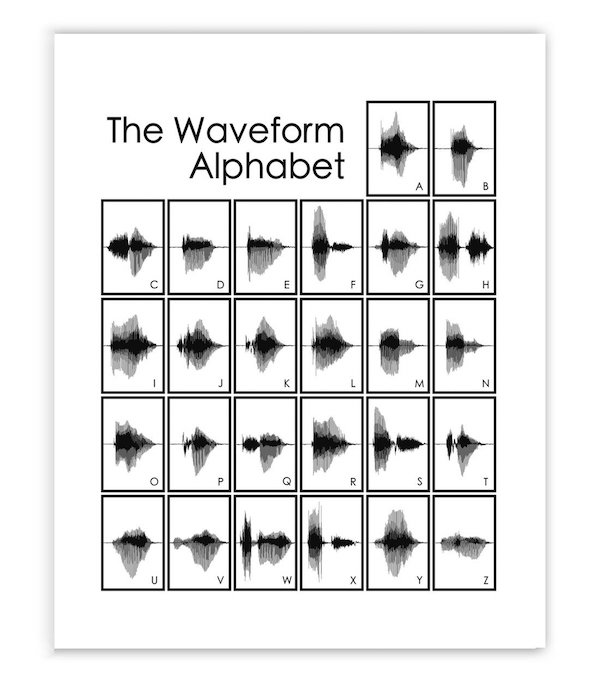
What you would do is look for the ‘ess’ in the waveform, which usually looks something like a solid (American) football shape. Then you’d separate the ess into its own clip and pull the gain down on it.
Manual de-essing has other benefits, too, in that it lets you decide how hard sibilance hits other parts of the signal chain. Nothing’s worse than setting up a great sounding vocal chain and realizing every time the singer hits an ‘ess,’ the compressor noticeably clamps down and sounds weird. Everything was fine up until then!
Of course, manual de-essing involves a lot of time and patience, but if it makes your vocals sound incredible, it’s time well spent!
De-ess in stages.
This is a common tip for approaching compression as well. The idea isn’t to slam one processor for major amounts of gain reduction, because that’s when compression gets unnaturally audible. Instead, you get a dB or two here, and a dB or two there.
It’s the same with de-essing. Your results will be much more natural if you de-ess a little bit here, and a little bit there, using more than one in your chain. For example, you might try manually de-essing a dB on the biggest offenders while still having a de-esser plugin active in the signal chain. This way you aren’t relying on the plugin for all of the dynamic control you need.
Automate your de-esser settings.
It’s very tempting to set it and forget it, right? In fact, lots of engineers do! However, this isn’t maximizing the potential of the performance for the best possible sound.
Realistically, there are countless variations in a vocalist’s recording making sibilance sound different throughout the song. You can find a solid middle-of-the-road frequency that catches most of the worst offenders, but taking the extra time to automate when a different ‘ess’ slips through the cracks can really help a performance shine.
Check out our other Tips for Mixing Vocals!
Which de-esser is best?
That’s a tough call. Rather than trying to narrow it down to just one, these are a few of our favorite plugins that combine a variety of factors, namely ease of use and transparency.
Eiosis E2Deesser
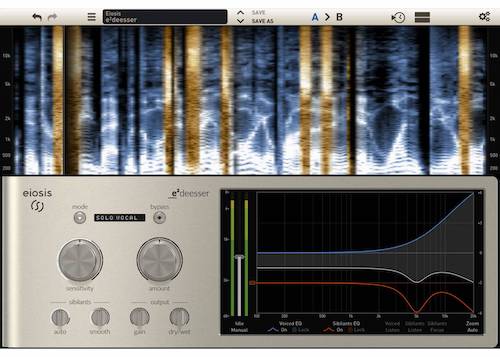
Eiosis is all about simplicity and fantastic sound. With the E2, you can de-ess vocals in about 10 seconds just by using the Sensitivity and Amount controls. You don’t even have to select a center frequency. Of course, it has advanced features as well, in the event you have more than 10 seconds to work on de-essing.
FabFilter Pro-DS
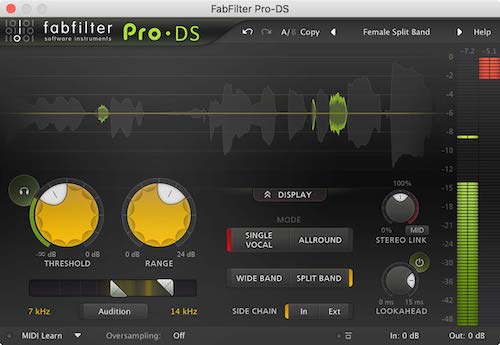
Pro-DS is an awesome combination of intelligent sibilance detection and extremely transparent attenuation of offending frequencies. It’s like anything else FabFilter: easy on the eyes, easy on controls, and it just plain works.
Waves Renaissance De-Esser
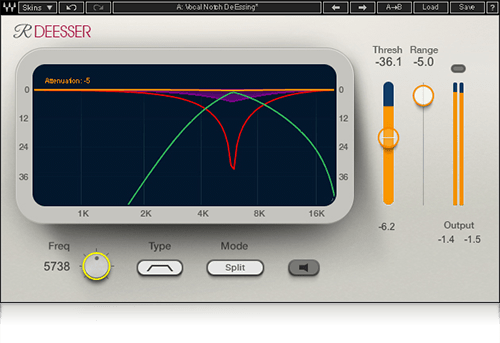
Waves RDe-Esser is one of the best values going. It combines technology from three other plugins: the C4 multiband compressor, RVox vocal plugin, and their standard DeEsser. It’s super easy to use and effectively de-esses in just a few quick moves.
Sonnox Oxford SuprEsser
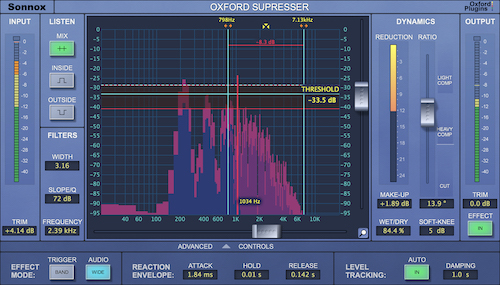
SuprEsser goes a bit beyond the average de-essing plugin. It operates on the full frequency spectrum for starters, and also provides a spectrum analyzers so you can see where the sibilance or anything else is at its worst. For quick fixes, you can run it in Simple mode; for everything else, there’s Advanced.
Oeksound Soothe
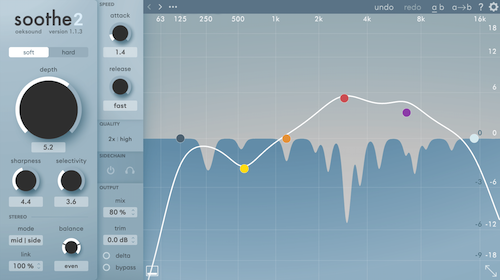
Not a de-esser specifically, Soothe is what the company calls a dynamic resonance suppressor. It helps clean up all kinds of different EQ problems, from harshness and sibilance to muddiness and uneven frequency balance. This all-arounder is a must-have!
Conclusion
‘De-esser’ isn’t just the name of a plugin. It’s literally a technique to make vocals easier on the ears, whether that’s through microphone choice on the way in, the old school compressor/sidechain filter trick, manual editing in your DAW, or a plugin. More often than not, good de-essing is a combination of manual edits, de-essing plugins, and automation!